Courses, teams, billing, roles, permissions, and rollout rules in one server-rendered guide.
Section 1
1 / 9
IgniteIQ Company Admin Portal
The Company Admin Portal is your centralized command center for managing your organization's learning ecosystem on the IgniteIQ platform. As a Company Admin, you have full access to create courses, manage teams and users, assign training, track progress, configure billing, and control roles and permissions across your organization.
What's new: IgniteIQ now exposes department limits, certificate-enabled course usage, and quota notifications more clearly across the portal. You can also track shipped platform changes in the public product changelog.
What This Guide Covers
First Login & Setup: Access your portal, complete onboarding, and configure your admin profile.
Navigation & Layout: Master the admin interface — sidebar, header, breadcrumbs, quick search, and responsive design.
Dashboard Overview: Understand your summary stats, charts, and top published courses at a glance.
Team & User Management: Create teams, invite users, manage profiles, and handle account statuses.
Courses Management: Create, edit, and publish courses with the five-step course wizard.
Course Assignments: Assign courses from the course page or bulk-assign from the users list.
Roles & Permissions: Understand built-in roles, permission labels, and access control best practices.
Billing & Subscription: Manage plans, payment methods, credits, and invoices.
Release Awareness: Review what shipped recently, what changed operationally, and where to report release issues.
Company Admin Capabilities
Manage all teams, users, and roles within the organization
Create, edit, publish, and delete courses
Assign courses to any team or individual
View all analytics and generate reports
Configure billing, subscriptions, and payment methods
Manage company settings, appearance, and integrations
Access audit logs and compliance reports
Section 2
2 / 9
1. First Login & Setup
Access & Login URL
Your admin portal URL will be provided by your platform owner:
Note: Both endpoints present the same login screen with identical functionality.
Login Page Elements
Email input: Required; validation shown on blur
Password input: Required; reveals strength meter
Sign-in button: Disabled until fields are filled
SSO button: Visible only when SSO is active
Forgot link: Sends reset email
Two-Factor Authentication
If 2FA is enabled for your account, after clicking Sign In:
A modal titled "Two-factor authentication" appears
Enter the code from your authenticator app
Click Verify
Optionally click "Remember this device" for this browser
First-Time Setup Wizard
On your first login, you'll be guided through a setup process with two possible overlays:
Onboarding Wizard
Progressive steps that help you set up your account:
Company Details: Enter company name, upload logo, select timezone
Admin Profile: Add your name, upload avatar
Optional: Connect billing information or skip to complete later
Billing Setup
If no payment method exists, you'll see options to:
Enter credit card information (Stripe)
Choose mobile-money provider
Select free plan and continue
Complete Your Profile
Step 1: Verify Your Email
Enter the email address from your invitation
You'll receive a 6-digit verification code
Enter the code to verify your email address
Step 2: Set Your Password
Password requirements:
Minimum 8 characters
Must include: uppercase, lowercase, number, special character
Example: MyCompany@2025
Step 3: Personal Profile Information
First Name — Your first name
Last Name — Your last name
Job Title — Your role (e.g., "Training Manager")
Phone — Contact number (optional)
Profile Picture — Upload a headshot (JPG/PNG, max 5MB)
Step 4: Organization Information
Company Name — Already pre-filled from invitation
Industry — Select from dropdown menu
Company Size — Number of employees
Website — Your company website (optional)
Step 5: Set Your Preferences
Theme — Light or Dark mode preference
Email Notifications — Choose frequency (daily, weekly, none)
Time Zone — Select your timezone for scheduling
Step 6: Complete Setup
Review all information and click Finish Setup to access your dashboard.
Session Behavior
Auth token is stored in HTTP-only cookie named accessToken
Session times out after 30 days of inactivity (configurable by your organization)
Manually logout via avatar dropdown → Sign Out
Clearing cookies will also end your session
Security Tip: Always log out when using a shared or public computer.
Troubleshooting First Login
Problem: Invitation Link Expired
Contact your platform administrator to resend the invitation
Invitations are typically valid for 7 days from the send date
Problem: Can't Remember Password
Click "Forgot password?" on the login page
Enter your email address
Check your inbox for a password reset link
Follow the link to create a new password
Problem: 2FA Code Not Working
Ensure your device time is synchronized (2FA codes are time-based)
Wait for a new code to generate (codes refresh every 30 seconds)
If issues persist, contact support to disable and re-enable 2FA
You're All Set! Once setup is complete, you'll be redirected to your Dashboard where you can start managing courses, teams, and users. Need Help? Contact support_lms@ignite.amaratechit.com
Section 3
3 / 9
2. Navigation & Layout
Mastering the Admin Portal Interface
Global Shell Overview
The admin portal interface consists of four main components that remain consistent across all pages:
Global Shell Overview
1
Sidebar — Navigation menu
2
Header — Search, notifications & avatar
3
Content — Main dashboard area
4
Footer — Version & legal links
5
Stats Cards — Key metrics at a glance
6
AI Credit Balance
1Sidebar — Navigation menu
2Header — Search, notifications & avatar
3Content — Main dashboard area
4Footer — Version & legal links
5Stats Cards — Key metrics at a glance
6AI Credit Balance
Sidebar
Navigation menu
Header
Search, notifications & avatar
Content Area
Main dashboard area
Footer
Version & legal links
Stats Cards
Key metrics at a glance
AI Credit Balance
Remaining credits indicator
Layout Tip: The sidebar can be collapsed to maximize content viewing area. Your preference is saved per browser.
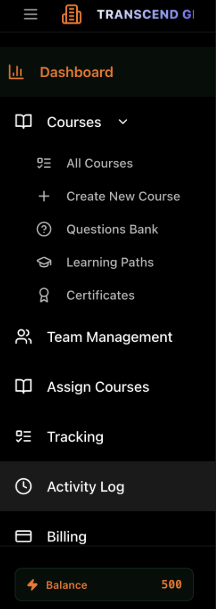
Sidebar Structure
The sidebar provides primary navigation to all major sections of the admin portal:
Dashboard
Courses (expandable)
Team Management
Assign Courses
Tracking
Activity Log
Billing
Settings
Support
Sidebar Structure
1
Company logo & hamburger toggle
2
Active page highlight (Dashboard)
3
Expandable sub-menu (Courses)
4
Primary nav items
5
AI Credit balance indicator
1Company logo & hamburger toggle
2Active page highlight (Dashboard)
3Expandable sub-menu (Courses)
4Primary nav items
5AI Credit balance indicator
Sidebar Behavior
Desktop
Click menu button to toggle collapse/expand
Collapsed: icons only
Expanded: icons + labels
State persists across sessions
Mobile
Hidden by default
Tap menu button to open as overlay
Tap outside to close
Auto-closes after selecting a page
Header Components
Breadcrumb Trail
Shows your current location in the portal hierarchy. Click any breadcrumb to navigate back to that level.
Avatar Dropdown
Click your avatar in the top-right corner to access:
Profile
Switch Company
Settings
Help & Support
Logout
Avatar Dropdown Menu
1
Avatar — click to open menu
2
Profile
3
Switch Company
4
Settings
5
Help & Support
6
Logout
1Avatar — click to open menu
2Profile
3Switch Company
4Settings
5Help & Support
6Logout
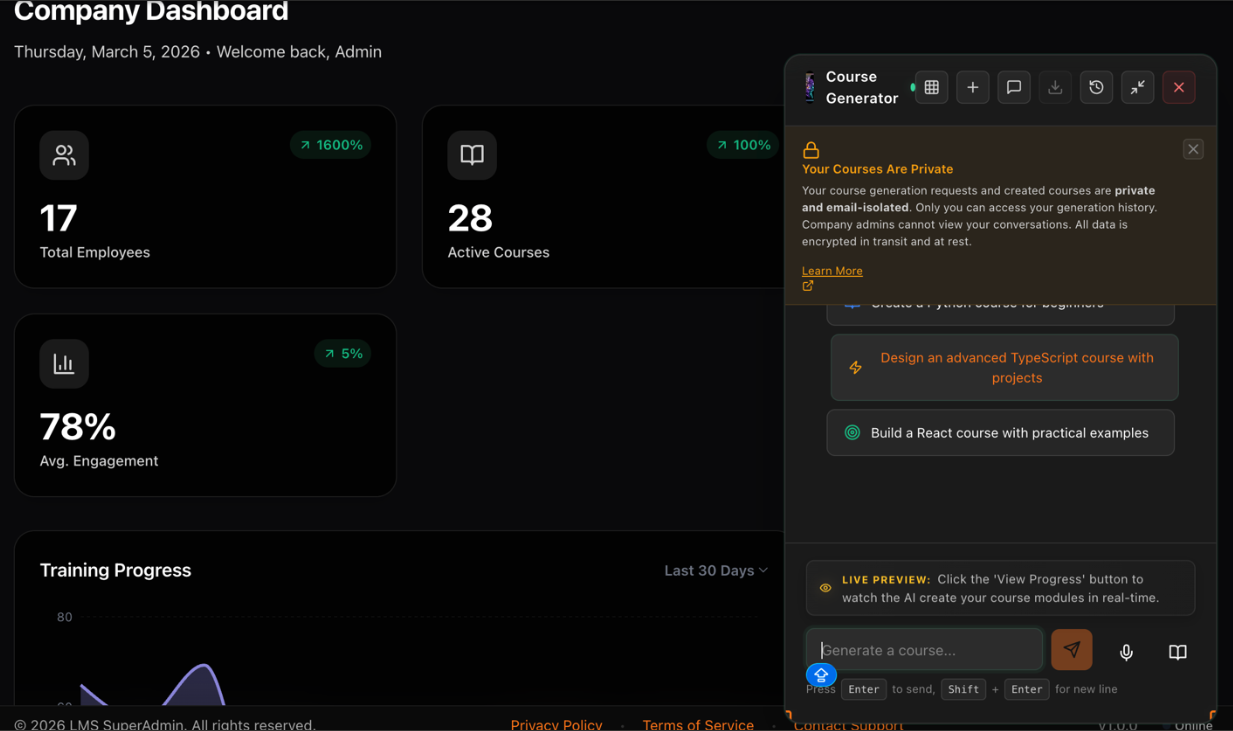
AI Agent (Ctrl+K / Cmd+K)
The AI-powered course generator and assistant — press Ctrl+K (Windows) or Cmd+K (Mac) to open instantly.
Course Generator
AI-powered panel
Privacy
Courses are private to your org
Suggested Prompts
Pre-built templates
Chat Input
Describe your course
Opening AI Agent
1
Course Generator panel
2
Privacy notice — courses are private
3
Suggested prompts
4
Chat input — describe your course
1Course Generator panel
2Privacy notice — courses are private
3Suggested prompts
4Chat input — describe your course
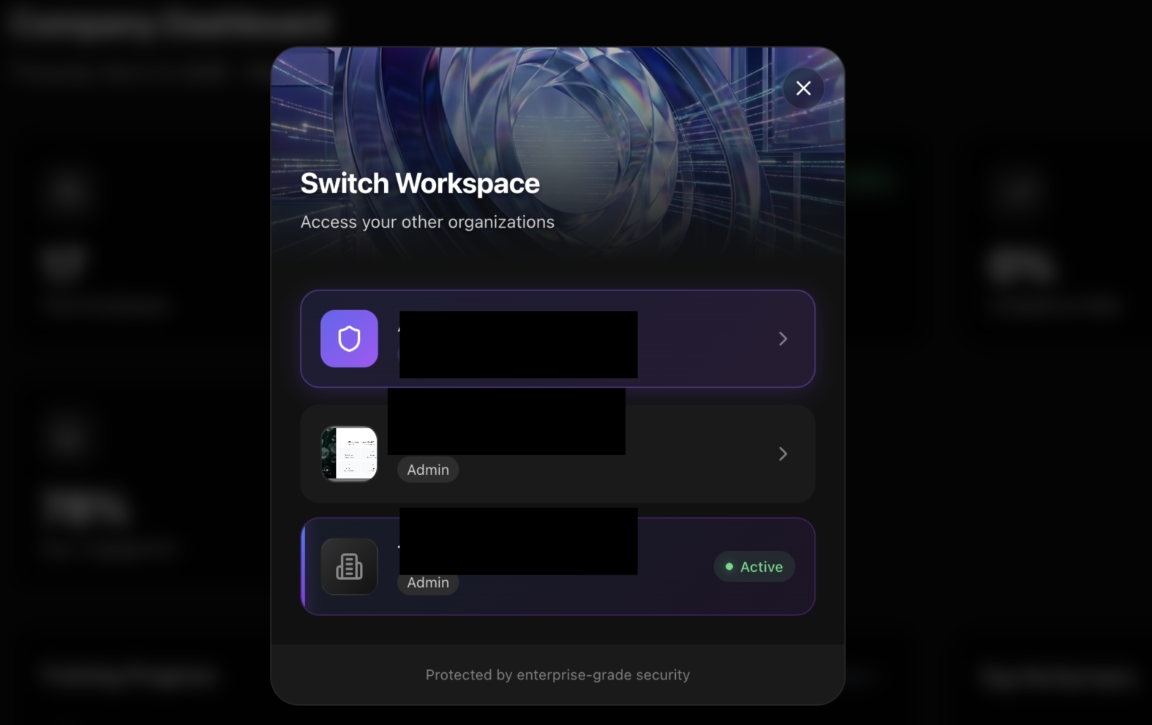
Company Switcher
If you belong to multiple organizations, switch between them via the sidebar or avatar menu.
Company Switcher Modal
1
Switch Workspace modal
2
Available organizations
3
Active workspace indicator
1Switch Workspace modal
2Available organizations
3Active workspace indicator
Your role may differ between organizations
Permissions are organization-specific
Switching causes a full page reload
Last selected org remembered on next login
Footer
Footer Information
1
Version number (v1.0.0)
2
Legal links — Privacy, Terms, Support
3
Online status indicator
1Version number (v1.0.0)
2Legal links — Privacy, Terms, Support
3Online status indicator
Version
v1.0.0
Legal Links
Privacy, Terms, Support
Status
Online status indicator
Keyboard Shortcuts
Ctrl+K / Cmd+KOpen AI agent
Ctrl+/ / Cmd+/View all shortcuts
EscClose modal or cancel
Ctrl+S / Cmd+SSave (when editing)
Ctrl+EnterSubmit form
Tab / Shift+TabNavigate fields
↑↓ arrowsNavigate list items
EnterSelect highlighted item
Pro Tip: Press Ctrl+/ (or Cmd+/ on Mac) anytime to view all available shortcuts for the current page.
Section 4
4 / 9
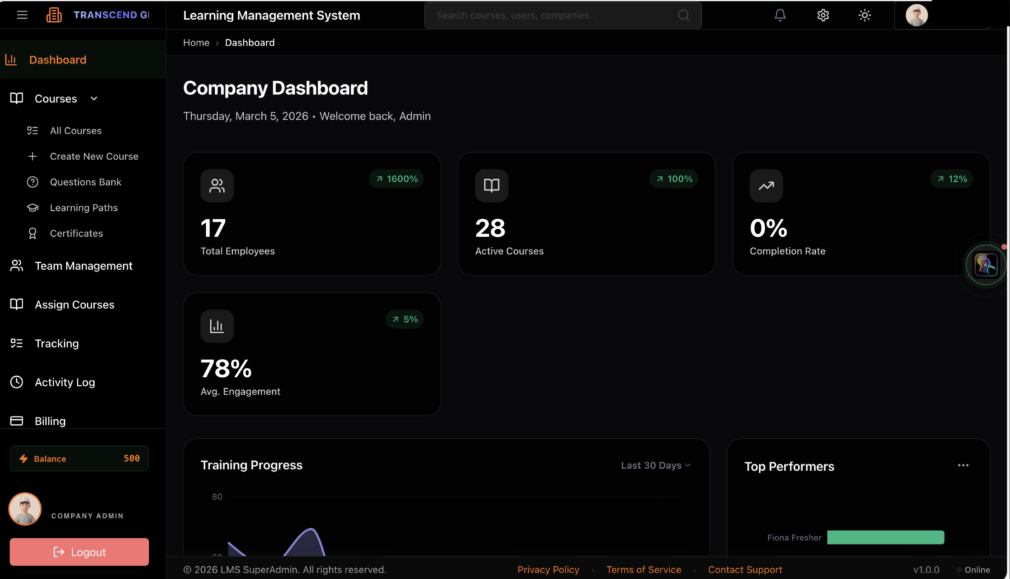
3. Dashboard Overview
The Dashboard is organized into three main vertical sections providing a comprehensive view of your organization's learning performance.
Summary Stats Cards
Each card shows a value, a mini-chart, and a trends arrow:
Total Learners
Active Courses
Completion Rate
Avg. Engagement
Hover for tooltip explaining calculation. Click "View Details" to jump to related page (e.g., courses list).
Charts
Two side-by-side charts:
Growth chart — Select metric via dropdown
Top performers — Bar chart
Top Published Courses
The bottom section displays your organization's most active and top-performing published courses, giving you an instant view of what content is driving the most engagement.
Admin Tip: Use the Dashboard as your daily check-in point. Monitor Completion Rate trends and Avg. Engagement to quickly identify when your team needs additional support or motivation.
Section 5
5 / 9
4. Team & User Management
Complete Guide to Managing Teams and Users
Latest update: Departments are now plan-aware. Owners create departments, admins can manage members without creating or deleting departments, and an assigned Head of Department can manage members only inside the department they lead. Department warning and limit events also appear in the notifications center.
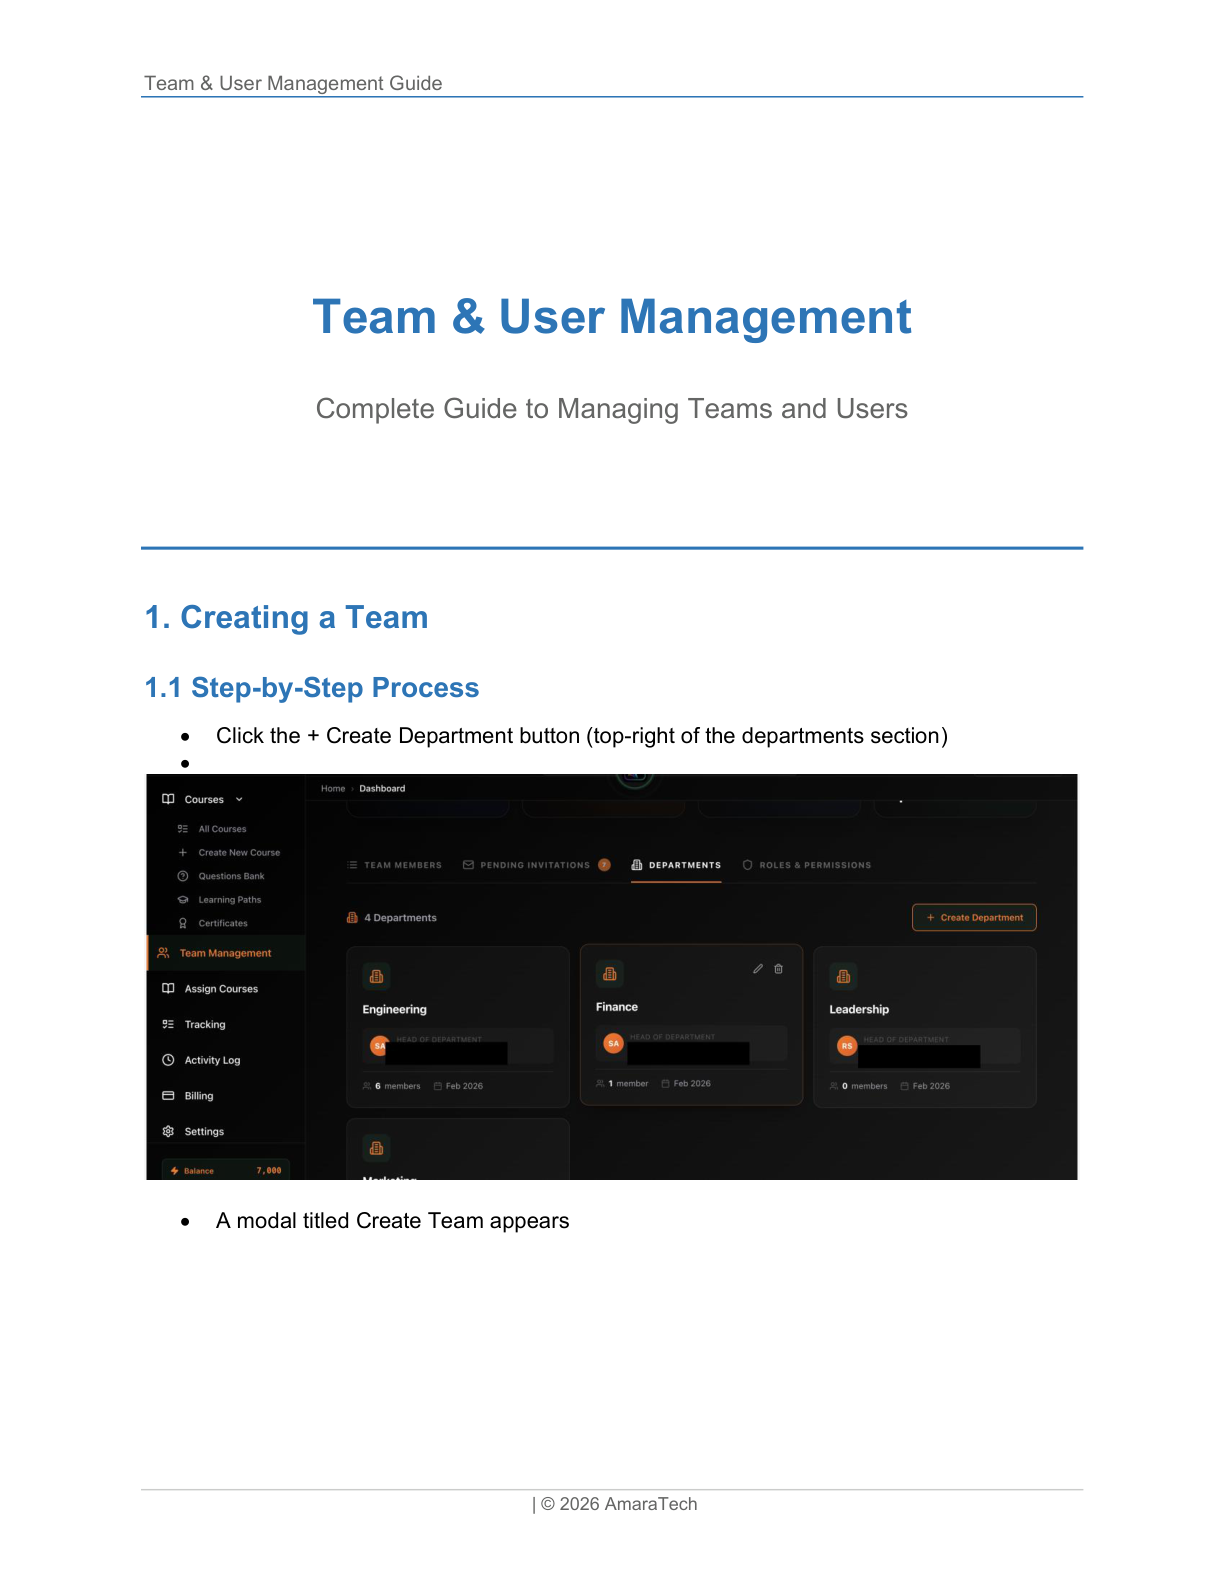
Creating a Department
Departments Overview
1
Department list table
2
+ Create Department button
3
Search & filter controls
1Department list table
2+ Create Department button
3Search & filter controls
Quota Rule
Each active department uses one department slot on the current plan. Deleting a department frees the slot.
Who Can Create
Company Owners create departments under the current rollout policy.
Who Can Manage Members
Owners and admins can manage members. Assigned department heads manage members only for their own department.
Step-by-Step Process
1Click + Create Department button (top-right)
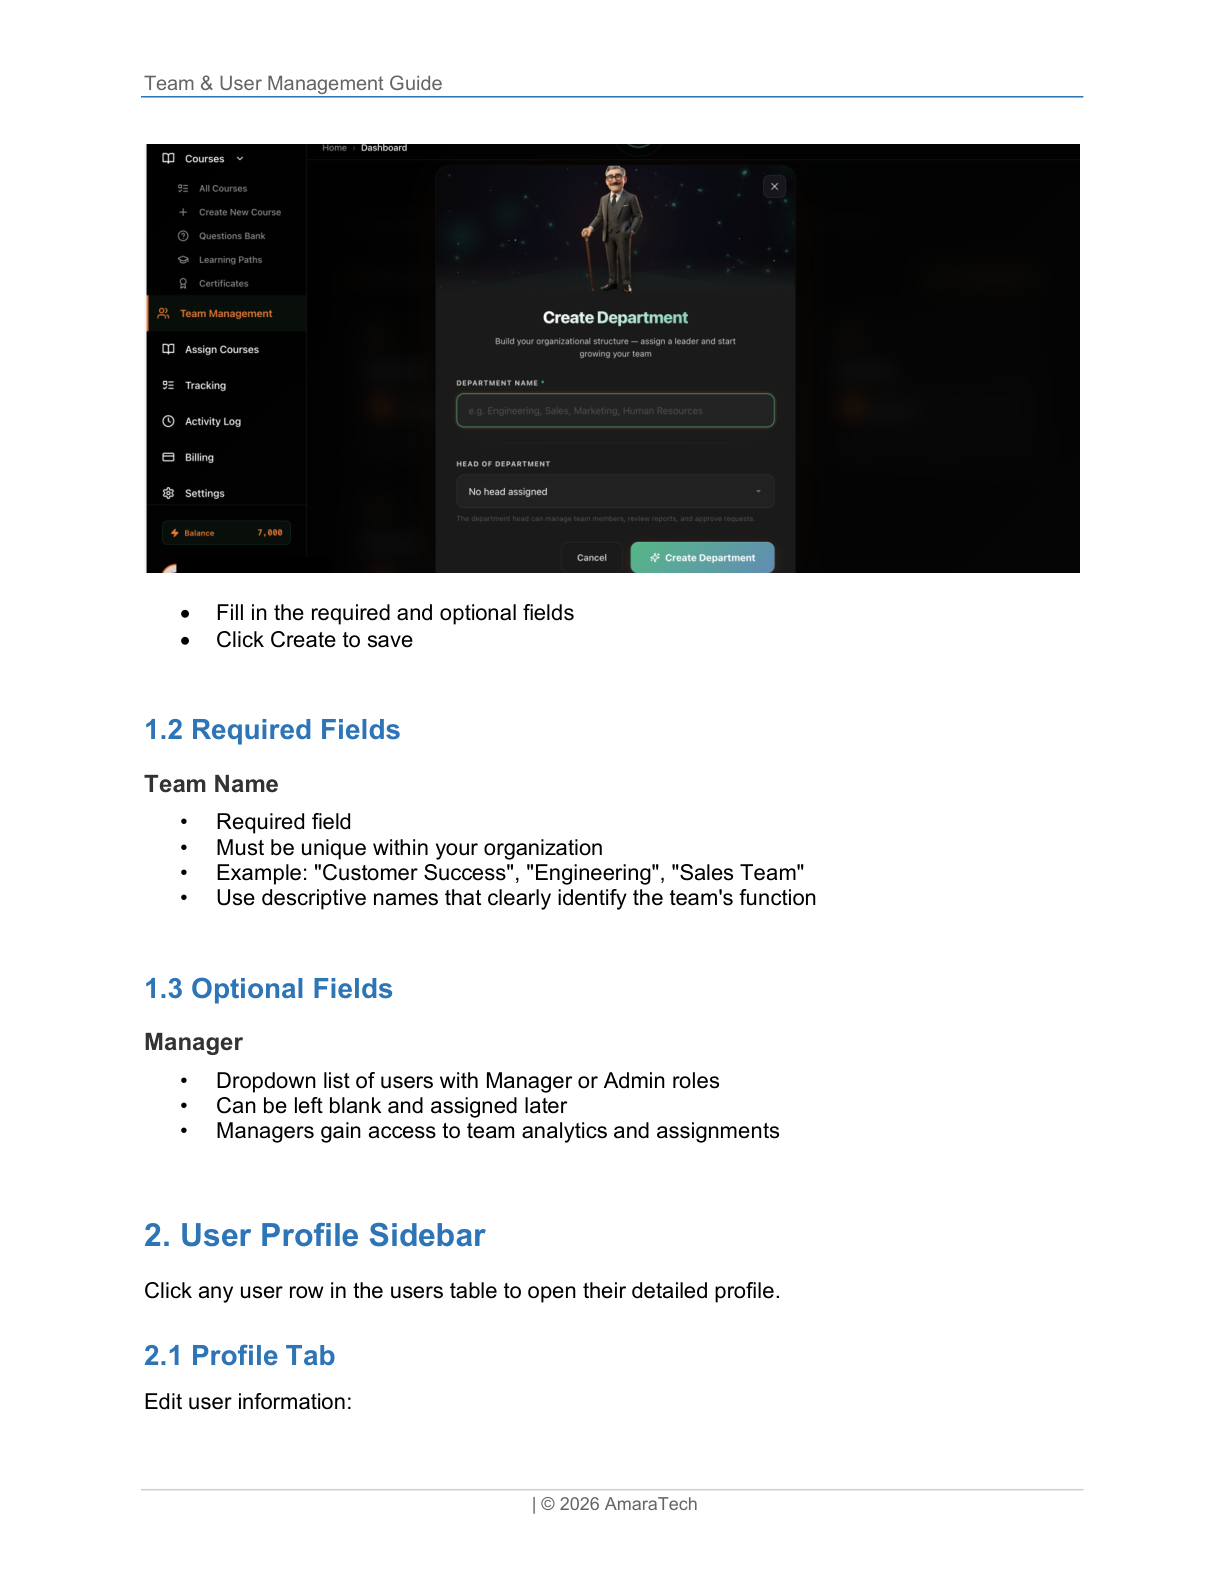
2A modal titled "Create Department" appears
3Fill in required and optional fields
4Click Create to save
Create Department Modal
1
Team Name field (required)
2
Manager dropdown (optional)
3
Create button
1Team Name field (required)
2Manager dropdown (optional)
3Create button
Required Fields
Team Name
Must be unique. Example: "Customer Success", "Engineering", "Sales Team". Use descriptive names that clearly identify the team's function.
Optional Fields
Head of Department
Optional leadership assignment. The assigned person can manage members inside that department and receives department-specific visibility.
Warning Threshold
When your organization approaches the department limit, IgniteIQ shows a warning in the department usage banner and sends an in-app notification.
Limit Reached
Once the limit is reached, creating another department is blocked until you delete a department or move to a higher plan.
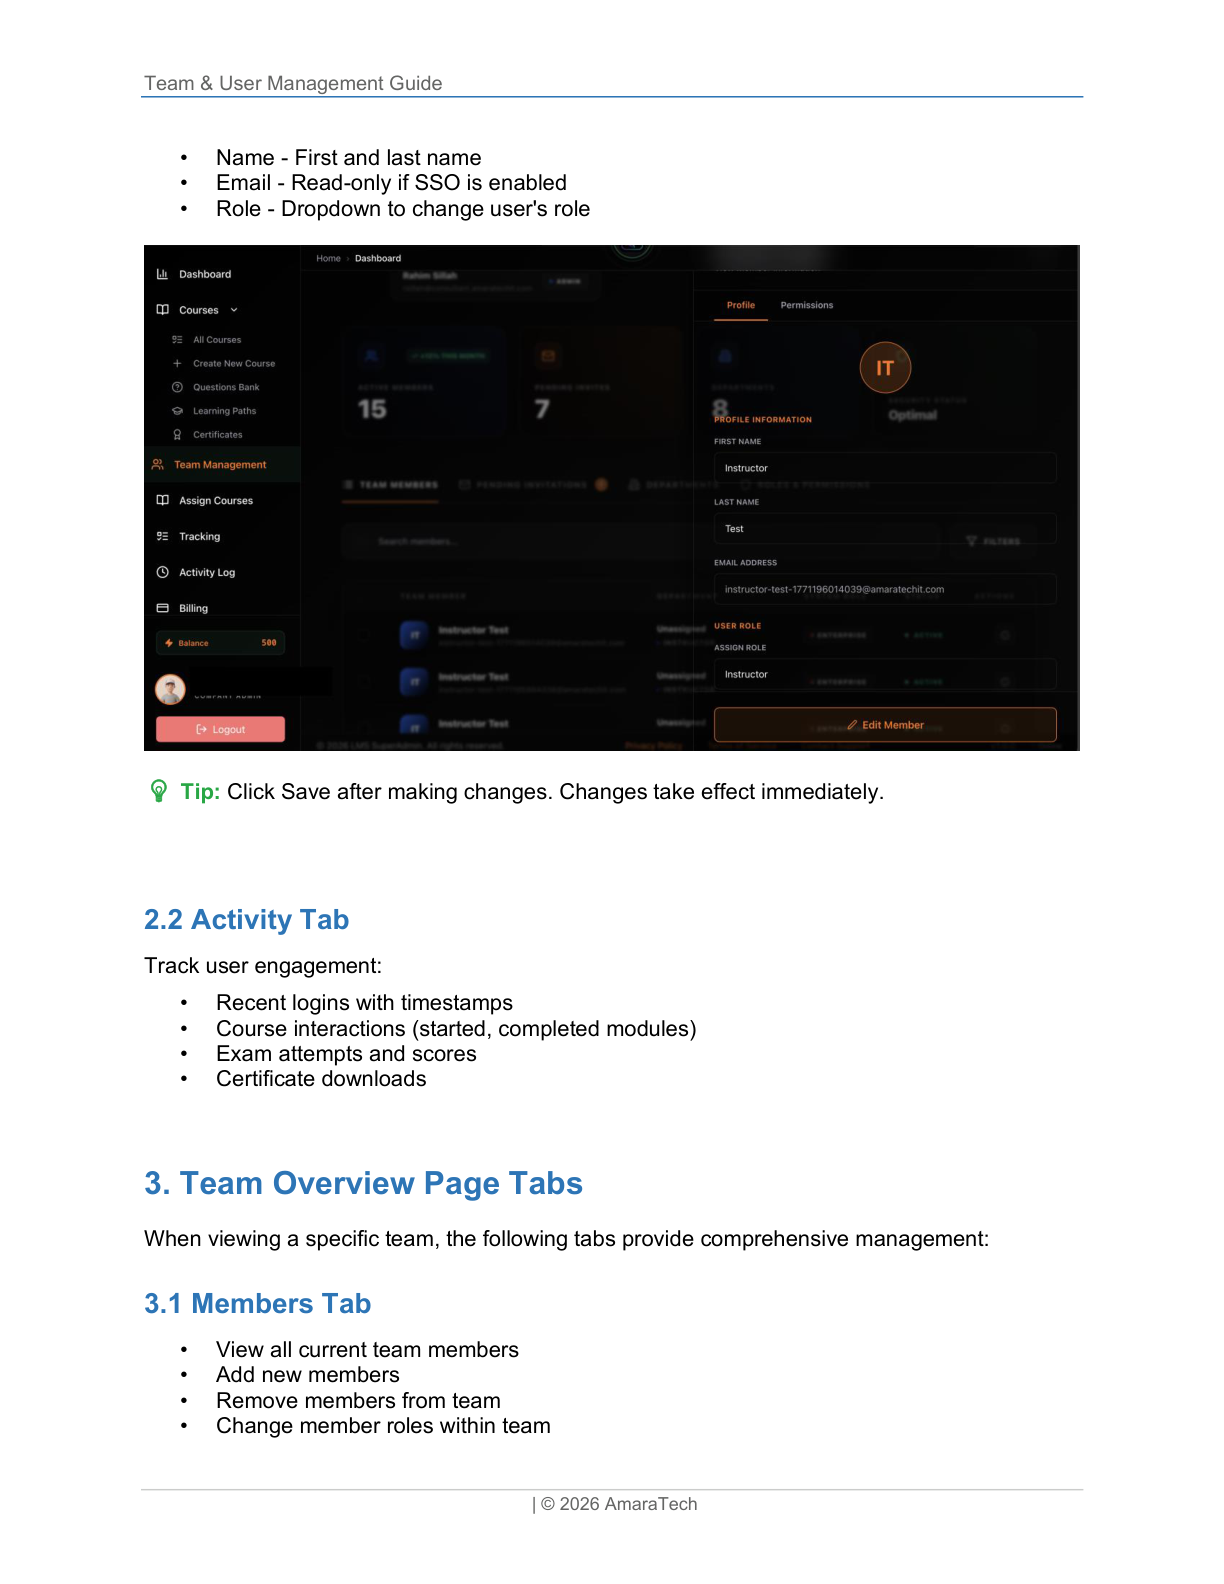
User Profile Sidebar
Click any user row in the users table to open their detailed profile.
User Profile Sidebar
1
Profile / Permissions tabs
2
User avatar & name
3
Profile Information fields
4
Assign Role section
5
Edit Member button
1Profile / Permissions tabs
2User avatar & name
3Profile Information fields
4Assign Role section
5Edit Member button
Profile Tab
Edit user information:
Name
First and last name
Email
Read-only if SSO enabled
Role
Dropdown to change role
1Profile / Permissions tabs
2User avatar & initials
3Profile Information fields
4Assign Role section
5Edit Member button
Tip: Click Save after making changes. Existing departments and member management continue to work even when creation of new departments is blocked by plan limits.
Activity Tab
Track user engagement:
Recent logins with timestamps
Course interactions (started, completed)
Exam attempts and scores
Certificate downloads
Team Overview Page Tabs
When viewing a specific team, the following tabs provide comprehensive management:
Members Tab
View all current team members
Add new members
Remove members from team
Change member roles within team
Activity Tab
Team-level activity log
Member additions and removals
Assignment changes
Course completions
Manager changes
User Account Statuses
Users can have different account statuses that control their access:
ActiveNormal operating status
Full access to assigned courses and features
InactiveTemporarily disabled
Cannot log in; enrollments preserved
SuspendedPolicy violation
Access revoked; audit trail maintained
PendingInvitation sent
Cannot log in until they accept invitation
Changing Account Status
1Open user profile sidebar
2Navigate to Settings tab
3Find Account Status toggle
4Select new status
5Click Save to confirm
Important: Inactive and Suspended users cannot log in but their course progress is preserved. Reactivating their account restores full access.
Best Practices
Team Structure
Align with org structure
5-50 members per team is ideal
Avoid too many small teams
Use consistent naming
Assign managers to teams
User Onboarding
Send invite with welcome message
Assign to team(s) immediately
Set up new hire course automations
Follow up on pending invites (2-3 days)
Provide first-login training
User Offboarding
Set status to Inactive (preserves data)
Remove from all teams
Revoke course assignments
Export completion records
Delete after retention period
Regular Maintenance: Review team membership monthly. Remove inactive users who haven't logged in for 90+ days. Update team managers when roles change. Audit pending invitations weekly and resend or cancel. Keep user profiles up to date.
Section 6
6 / 9
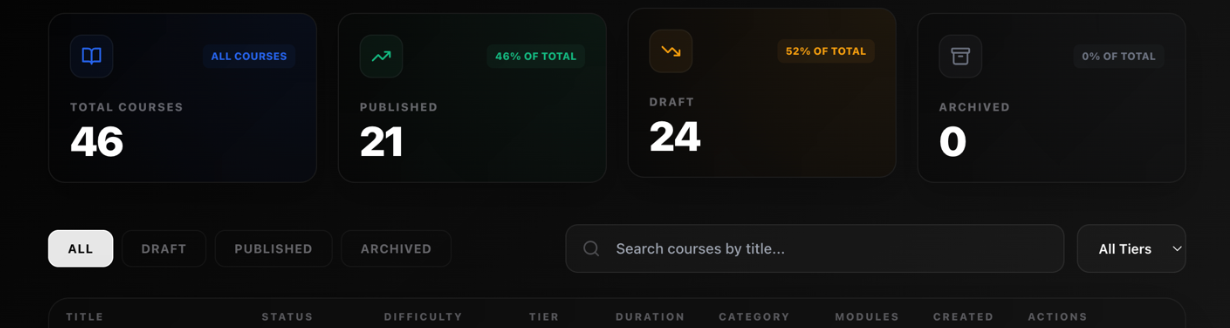
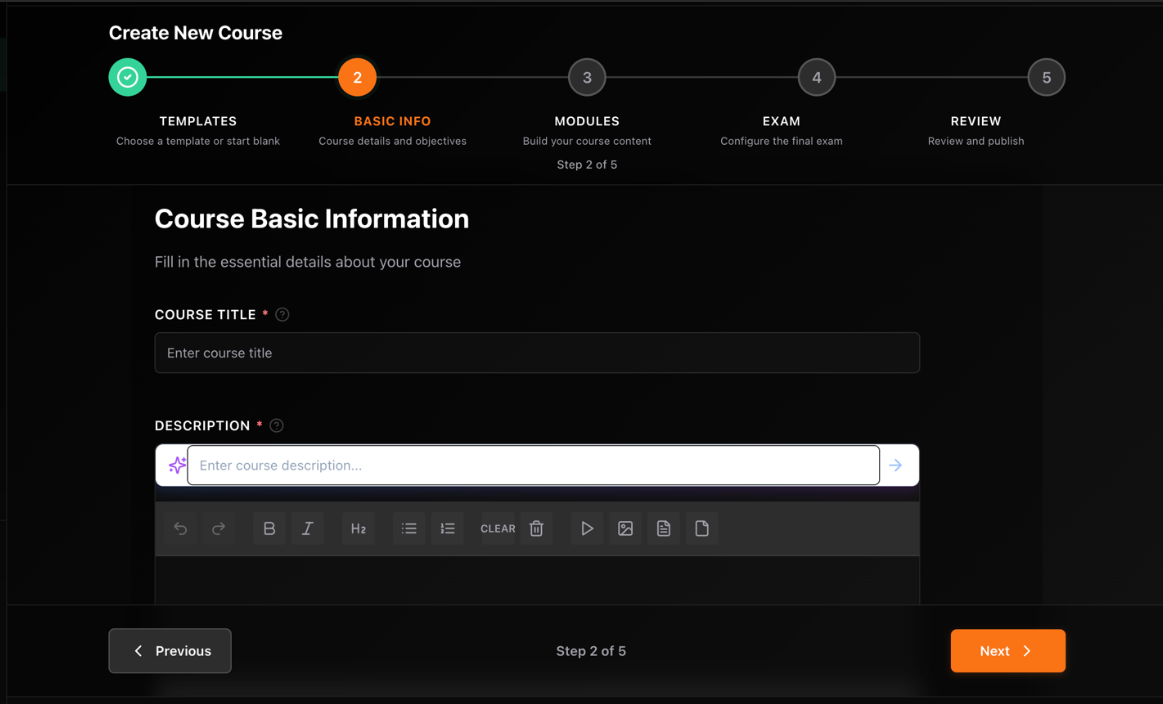
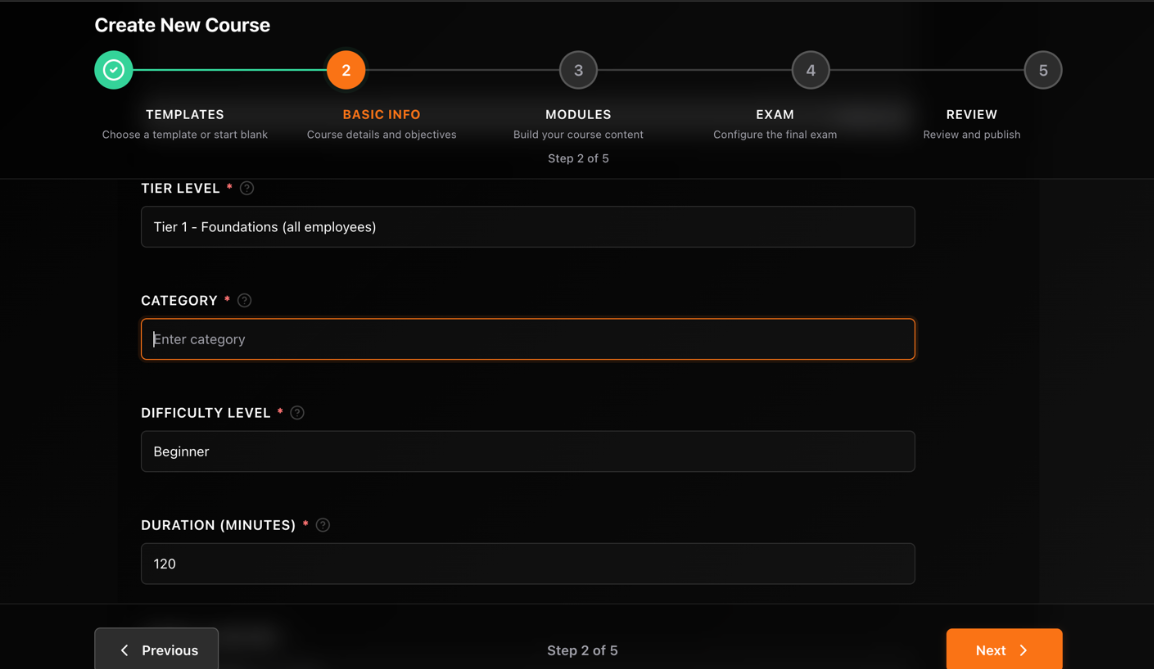
5. Courses Management
Complete Guide to Creating, Editing & Publishing Courses
Accessing the Courses Section
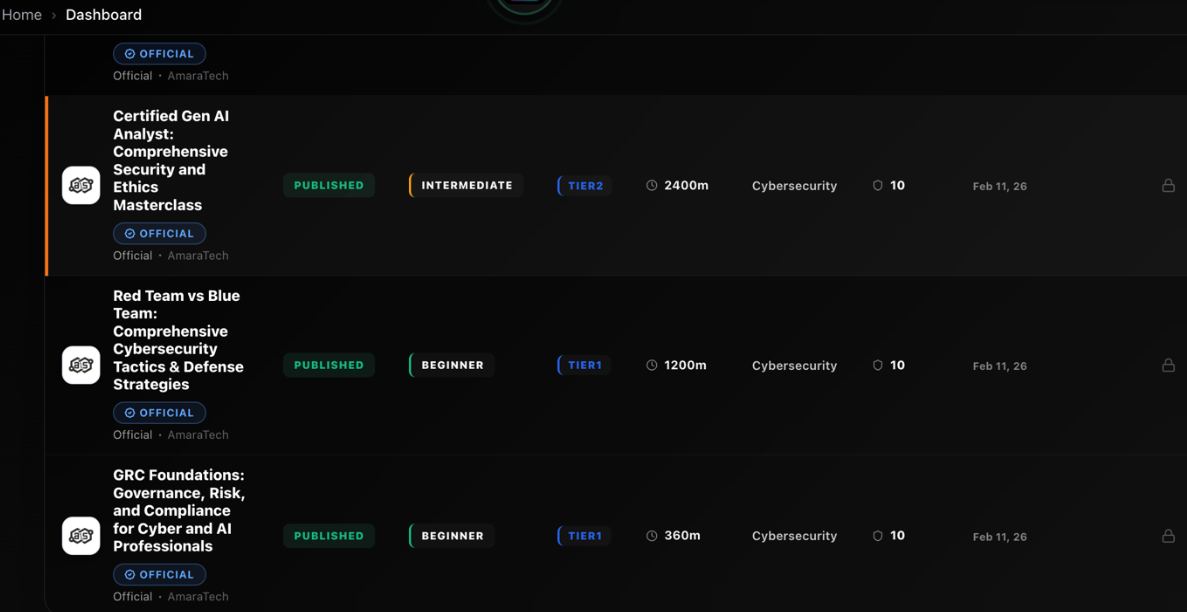
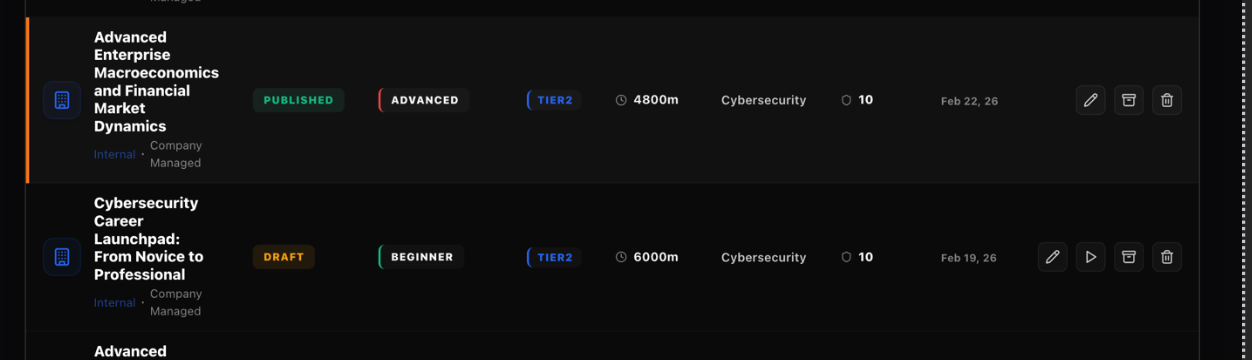
Path: Sidebar → Courses → All Courses. The courses page provides a comprehensive view of all your learning content, including courses created by your organization and courses from the AmaraTech catalog.
Courses Table Controls
The courses table includes powerful filtering, sorting, and search capabilities:
Courses Table Controls
1
Search box
2
Status filter pills
3
Course rows with actions
1Search box
2Status filter pills
3Course rows with actions
Search and Filter Options
Search box: Updates results in real-time as you type
Status filter: Pill buttons: Draft / Test Mode / Published / Archived
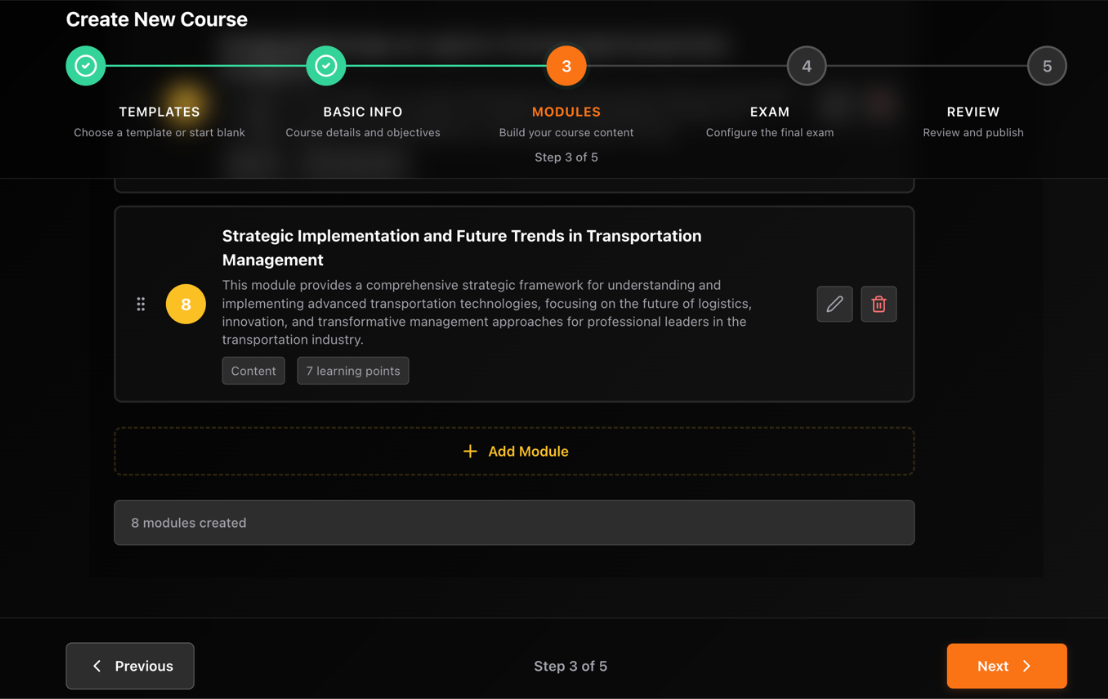
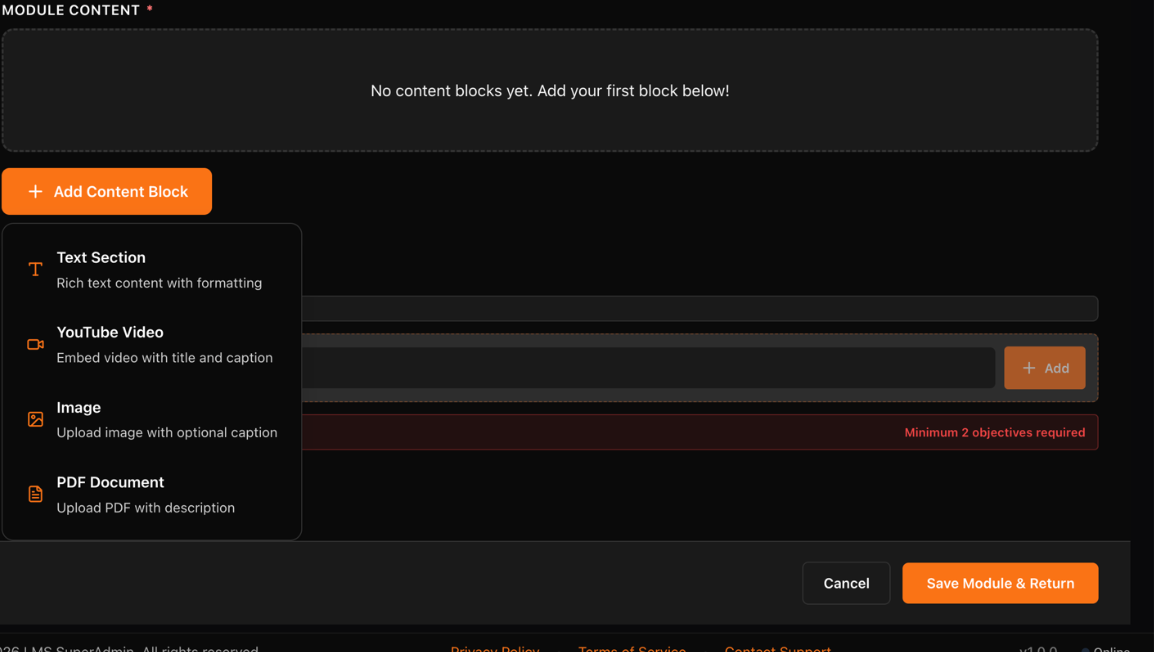
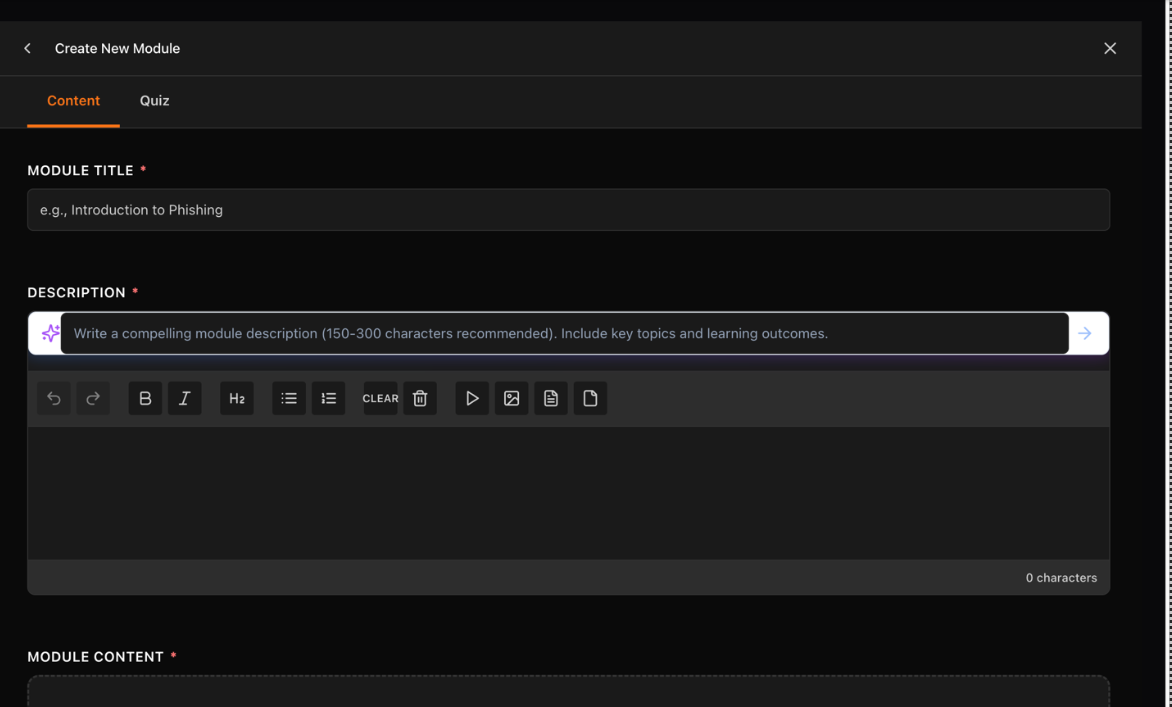
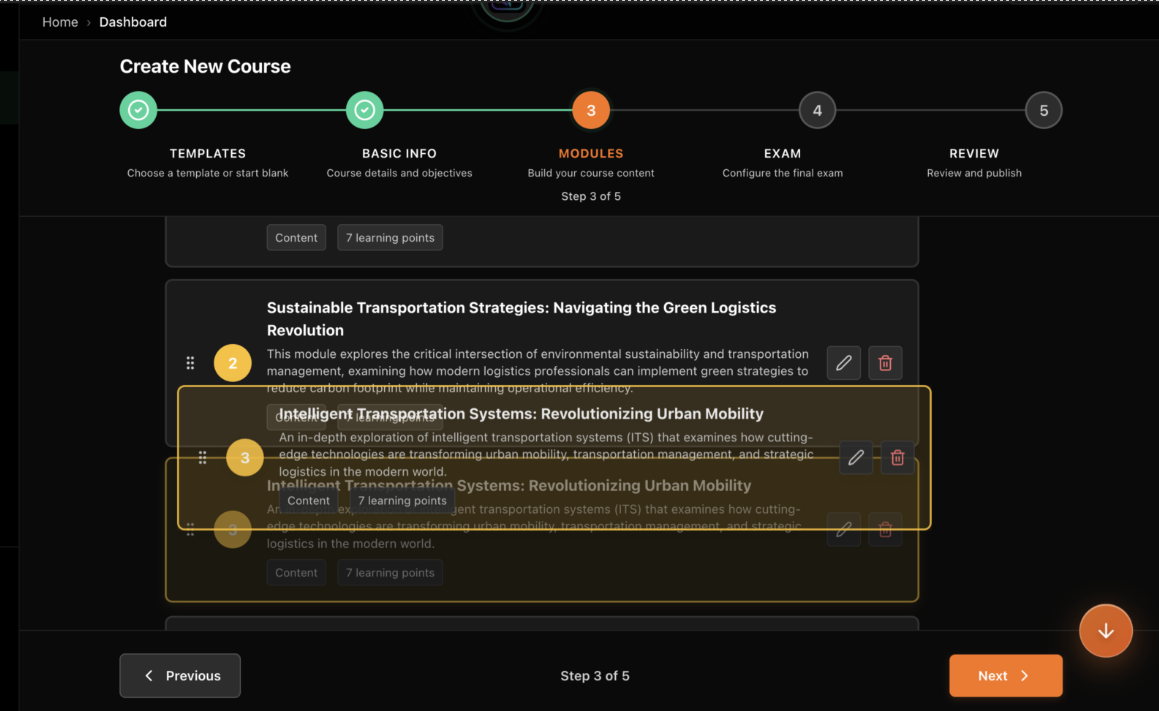
Module Best Practices: Keep modules focused — one topic per module. Aim for 5–15 minutes per module. Mix content types for engagement (video + quiz + document). Order modules logically from foundational to advanced.
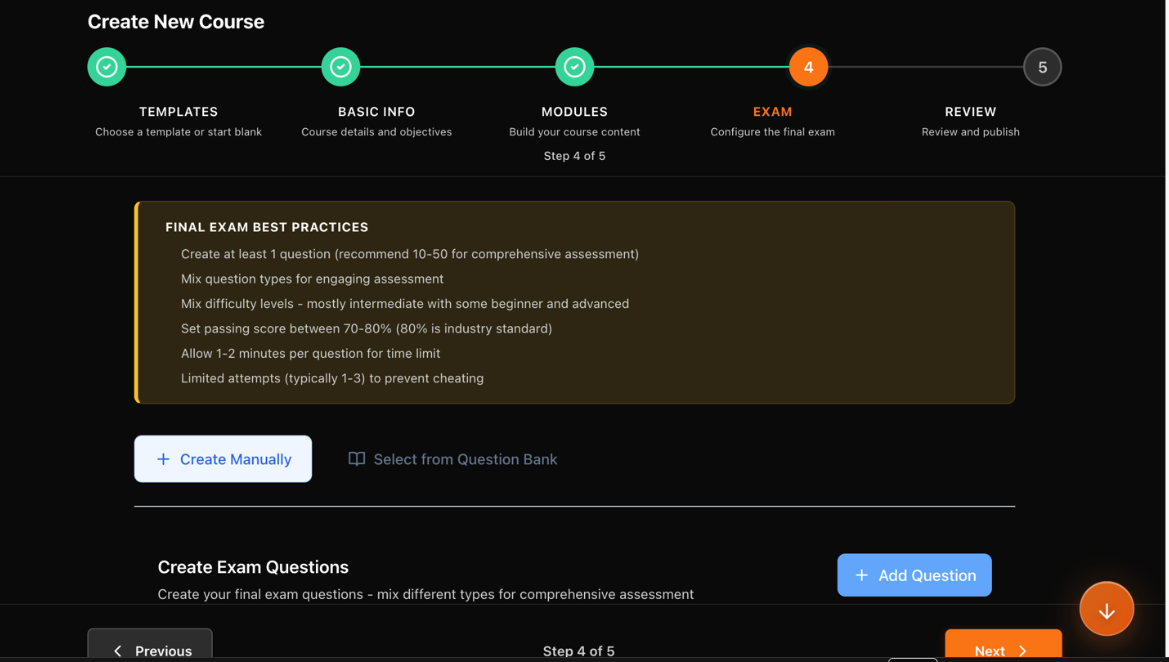
Step 3: Exam & Certificate
Step 3 — Exam Configuration
1
Add Question button
2
Question list
1Add Question button
2Question list
Step 3 — Question Types
1
Question type selector
1Question type selector
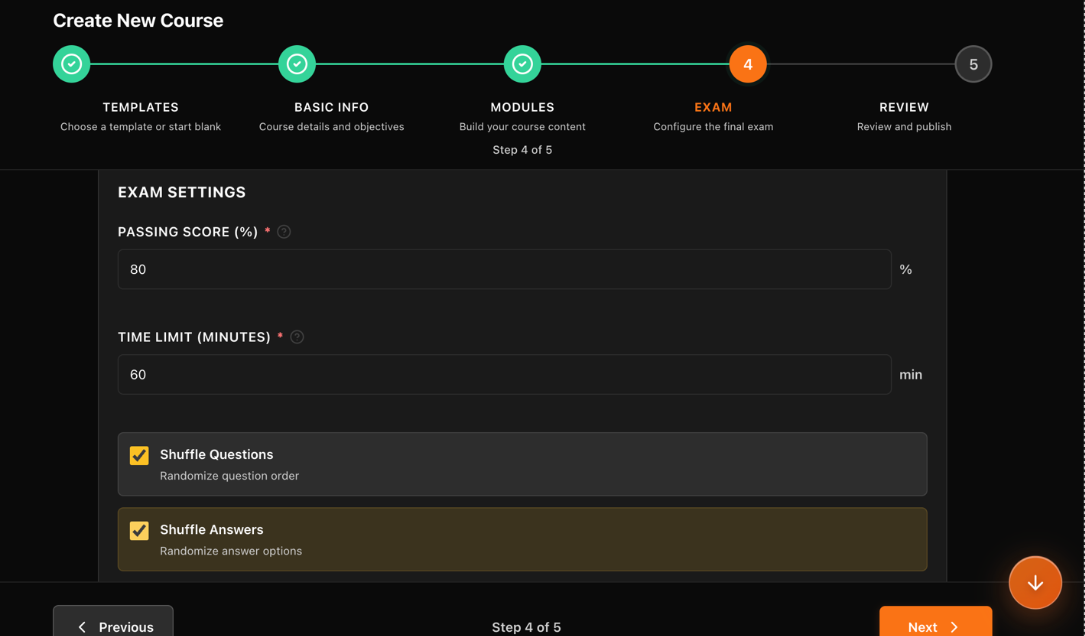
Step 3 — Exam Settings
1
Pass score & time limit
1Pass score & time limit
Step 3 — Shuffle Settings
1
Shuffle questions/answers toggles
1Shuffle questions/answers toggles
Step 3 — Certificate Template
1
Certificate template selector
1Certificate template selector
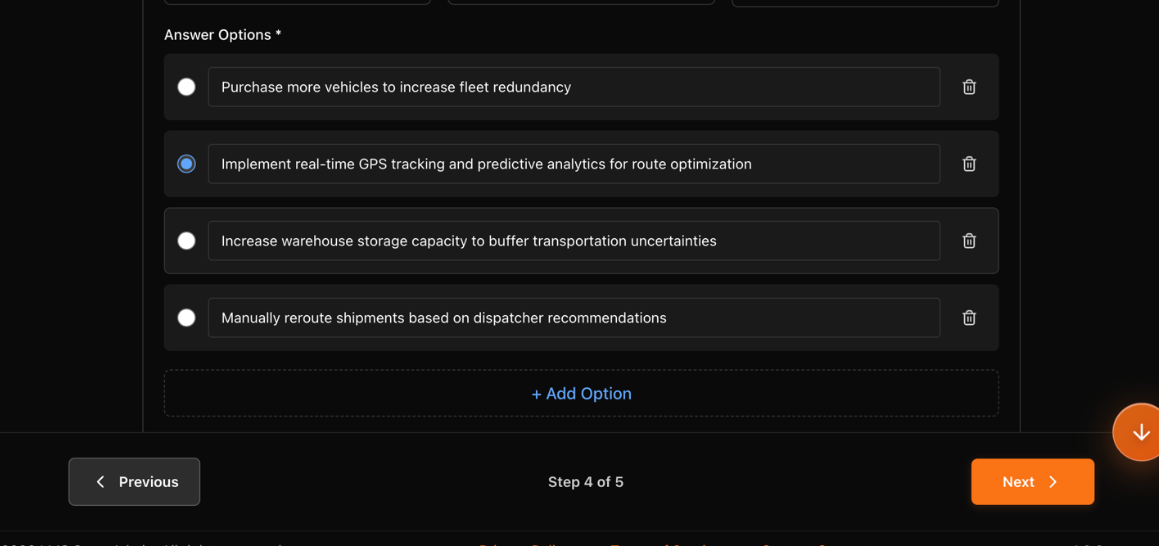
Exam Configuration:
Create Manually: Click "Add Question" and enter details
Import from bank: Select from existing question library
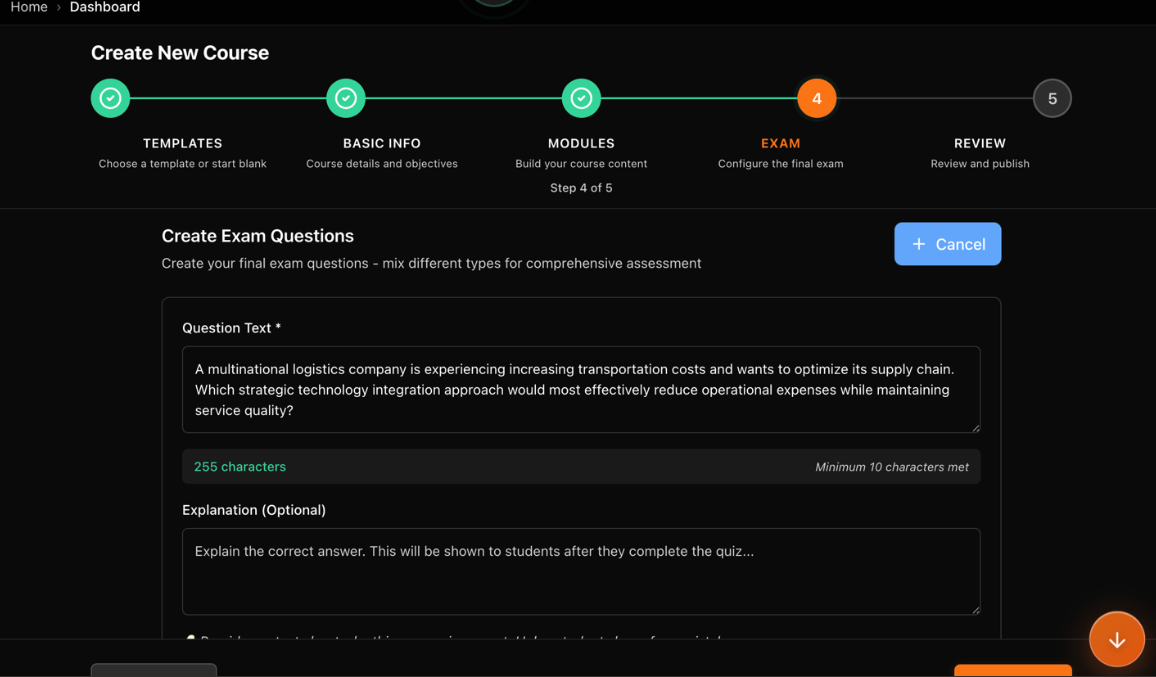
For each question, specify:
Question text
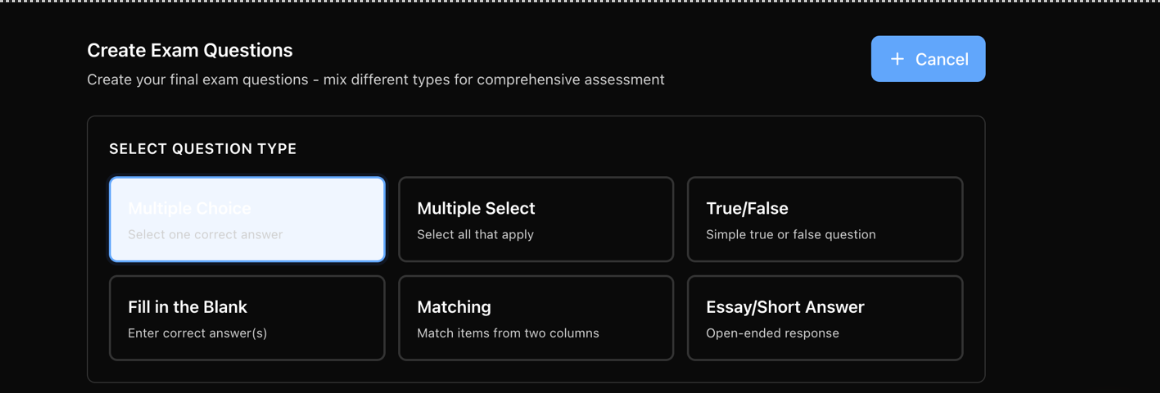
Question type
Answer options
Correct answer(s)
Points value
Question types available:
Multiple Choice
Multiple Select
True/False
Fill in the Blank
Matching
Essay
Exam settings:
Pass score (recommended: 70–80%)
Time limit per exam
Shuffle questions toggle
Shuffle answers toggle
Certificate Setup:
Select certificate template from dropdown
Each active course with a certificate attached uses 1 certificate-enabled course slot
The same certificate template can be reused across multiple courses
Removing the certificate or archiving the course frees the slot
NOTE: Certificate limits are measured at the course level, not by counting reusable certificate templates. If a default course certificate is attached when the course is saved or published, that course still counts toward usage.
Certificate-enabled courses: The banner in the course wizard shows how many courses on your plan can issue certificates. Reusing one template across many courses is allowed, but each active course with a certificate attached still consumes one slot.
Step 4: Preview
Simulate the learner experience before publishing:
Click through all modules
Test video playback & downloads
Take the exam to verify
Check mobile responsiveness
Toggle Fullscreen for better view
Checklist: Verify all content loads, links work, and navigation is intuitive before publishing.
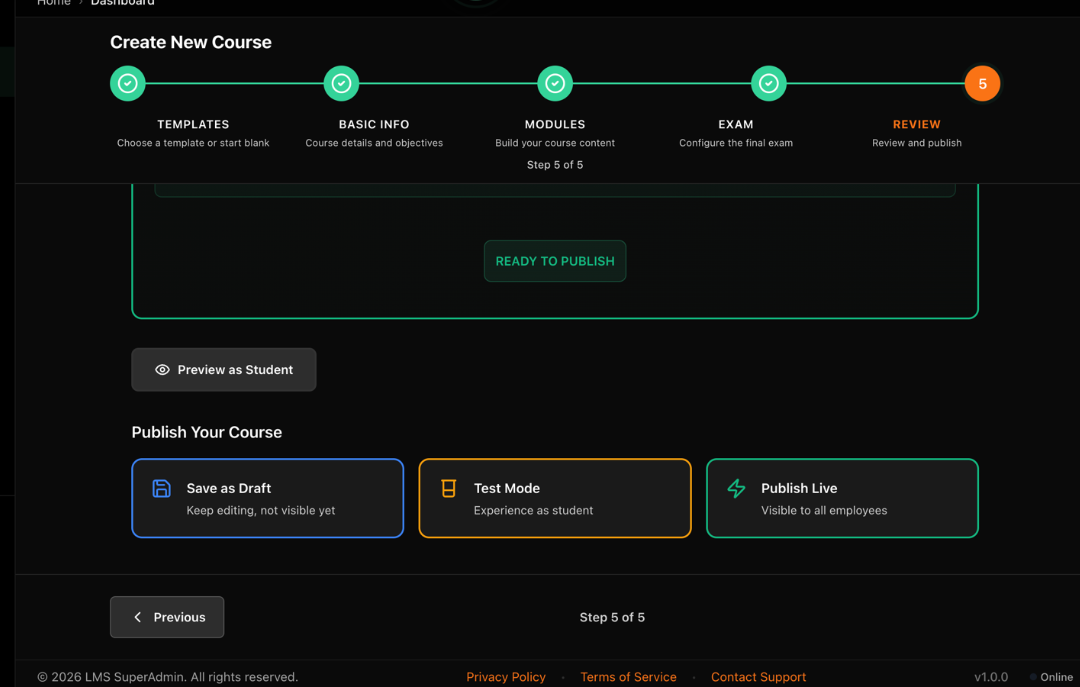
Step 5: Publish Settings
Step 5 — Publish Settings
1
Status options
2
Save & Publish actions
1Status options
2Save & Publish actions
Configure final settings and publish your course:
Status Options
Draft — Save work in progress, not visible to learners
Test Mode — Available to selected testers only
Published — Live based on visibility settings
Final Actions
Save & Exit — Saves as draft, returns to list
Publish Now — Immediately makes course live
Auto-Save: Progress is auto-saved every 15 seconds. An unsaved changes banner appears when navigating away.
Catalog Courses vs Owned Courses
AmaraTech Catalog Courses
1
AmaraTech logo badge + OFFICIAL tag
2
Read-only lock icon
1AmaraTech logo badge + OFFICIAL tag
2Read-only lock icon
Your Company Courses
1
Editable course actions
1Editable course actions
AmaraTech Catalog
AmaraTech logo badge + OFFICIAL tag
Lock icon — read-only, cannot edit or delete
Can be assigned to teams & individuals
Professional content by SMEs
Regularly updated by AmaraTech
Your Company Courses
Fully editable at any time
Can be duplicated, archived, or deleted
Custom content tailored to your needs
Your branding and style
Complete ownership and control
Warning: Deleted courses cannot be recovered. Archive instead if you might need them later.
Section 7
7 / 9
6. Course Assignments
Complete Guide to Course Assignments
Assigning from Course Page
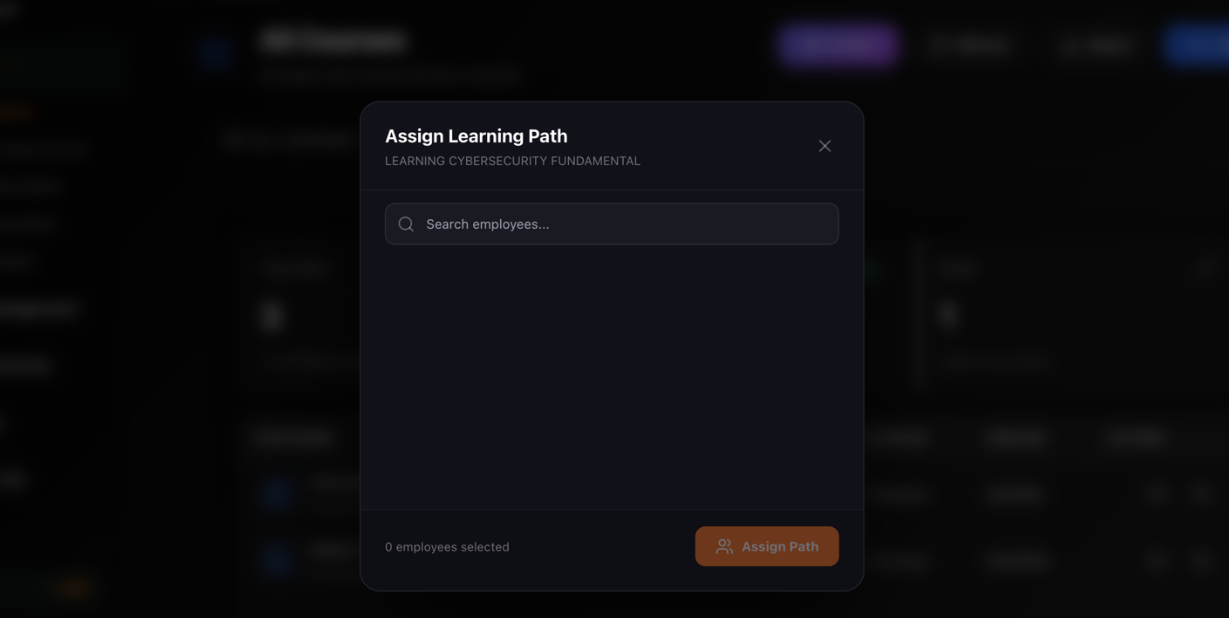
The method is to assign learning paths to your team members.
Assigning from Course Page
1
Learning Paths page
2
Assign button
1Learning Paths page
2Assign button
Step-by-Step Process
1Navigate to Courses then click on Learning Paths
2Click the Assign button under the actions column
3A modal appears with the list of your employees
4Use the search typeahead to find users
5Select one or multiple individuals
6Type part of a name or email to filter results
Assignment Configuration Modal
1
User search typeahead
2
Selected users list
3
Assignment settings
1User search typeahead
2Selected users list
3Assignment settings
Configure Assignment Details
After selecting recipients, configure these settings:
Assignment TypeEnroll Now or Schedule Enrollment
Start DateWhen the course becomes available
Due Date / WindowAbsolute date or relative (e.g., 14 days)
Auto-RemindersToggle ON/OFF and set schedule
Completion Req.All modules or Minimum score
Notify MembersToggle to send email notifications
Complete Assignment
1Click Assign button (or Schedule for future)
2Confirmation banner appears at screen top
3Example: "Assigned to 42 members. Notifications queued."
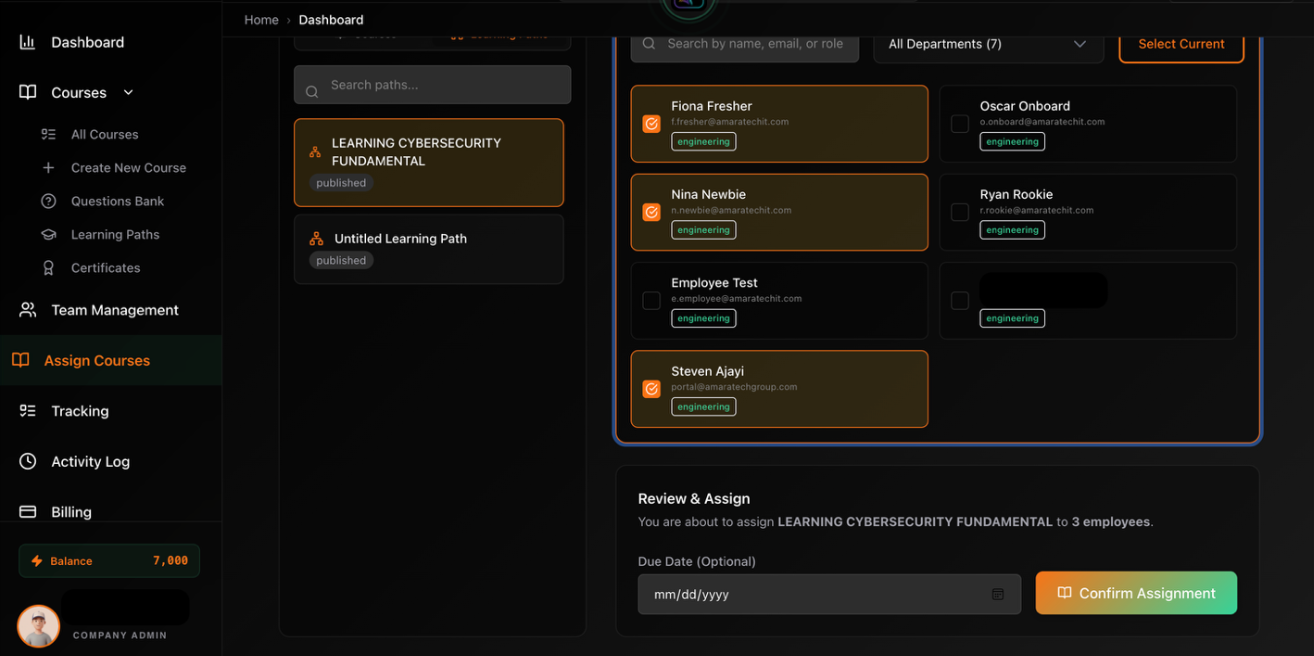
Scheduled Cohort Learning Paths
Use Scheduled Cohorts when a Learning Path needs to run like a class, onboarding wave, compliance window, or tutor-led training program. A cohort has its own learners, tutor, timezone, schedule, and publish status.
1Open Courses, then Learning Paths
2Create or open a Learning Path
3Switch to the Schedule Cohort workflow
4Name the cohort and select the tutor, learners, start date, and timezone
5Use Ready to Schedule courses for published content
6Review Needs Publishing before dragging; unpublished courses cannot be scheduled
7Drag courses into day columns and set unlock and optional expiry times
8Choose Free Will, Timed Unlock, or Strict mode
9Preview the learner timeline
10Publish the schedule when every blocker is resolved
Schedule Modes
Free Will
Learners can open scheduled courses immediately after assignment.
Timed Unlock
Courses unlock at the scheduled day and time, regardless of prior completion.
Strict
Courses follow the schedule and can require earlier work before later courses open.
Scheduled Cohort Rule: Published cohorts cannot contain draft, archived, deleted, test-mode, or otherwise unpublished courses. The builder lists the exact course titles that block publishing so you can fix them before learners see the schedule.
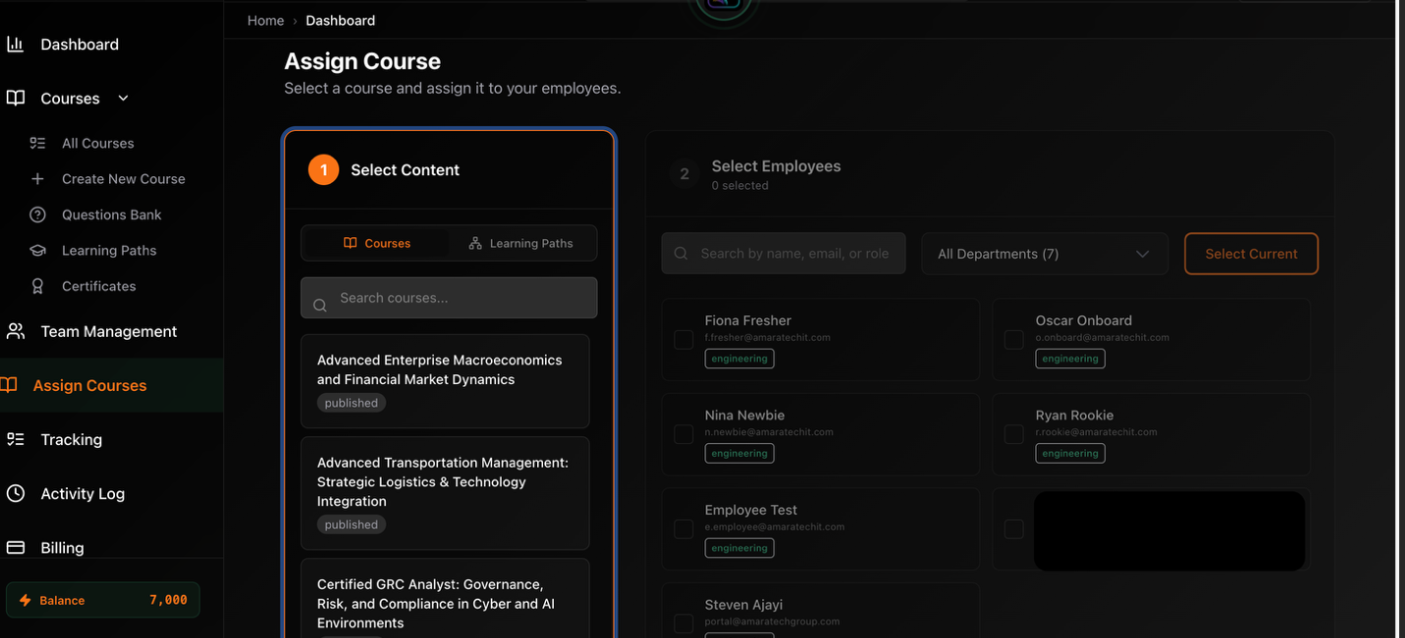
Bulk Assign from Users List
When you need to assign a course to specific users across multiple teams.
Bulk Assign — Users List
1
Checkbox selection column
2
Select All / Current controls
3
Assign button
1Checkbox selection column
2Select All / Current controls
3Assign button
Bulk Assign — Confirmation
1
Selected users count
2
Confirm assignment
1Selected users count
2Confirm assignment
Selection Process
1Navigate to the Assign Courses page
2Use checkboxes to select individual users
3Or click "Select Current" for all on the page
4Click the confirm Assign button at the bottom
Due Date Guidelines
Short courses (< 1 hr)
7-14 days
Medium courses (1-3 hrs)
14-30 days
Long courses (> 3 hrs)
30-60 days
Compliance training
Mandatory deadline
Professional dev
Flexible deadline
Master Your Assignments: Effective assignment management is key to driving course completion and ensuring your team stays current with required training. Use these tools to create efficient, automated workflows that scale with your organization.
Section 8
8 / 9
7. Roles & Permissions
Understanding Access Control in the Company Admin Portal
Overview
Roles and permissions control what users can see and do within the Company Admin Portal. Understanding the role hierarchy and permission structure is essential for secure and effective system administration.
This guide covers:
Built-in role types and their capabilities
Permission labels and where they apply
How to assign and modify roles
Best practices for role management
Built-in Roles
Company Admin
Scope: Full access at company level
Manage all teams, users, and roles
Create, edit, publish, delete courses
Assign courses to any team or individual
View all analytics and generate reports
Configure billing & subscriptions
Manage settings, appearance, integrations
Handle support tickets
Create and manage automations
Access audit logs & compliance reports
Manager
Scope: Limited to assigned teams
Capabilities
View and report on their own team(s)
Assign courses to team members
View team analytics and progress
Manage team member assignments
Restrictions
Cannot create or edit courses
Cannot manage users outside their team
Cannot access billing or org settings
Cannot view other teams' data
Course Admin
Scope: Course content management
Capabilities
Create, edit, and publish courses
Manage course modules and content
Create and edit exams and certificates
View course analytics and completion data
Restrictions
Cannot manage users or teams
Cannot assign courses to users
Cannot access billing or settings
Instructor
Scope: Teaching and grading
Capabilities
Teach or facilitate courses
Grade assignments and exams
View enrollments for assigned courses
Provide feedback to learners
Track student progress in their courses
Restrictions
Cannot create or edit course structure
Cannot manage users or teams
Cannot assign courses
Role Comparison Matrix
Capability
Company Admin
Manager
Course Admin
Instructor
Manage Users
✓
Own Team
✗
✗
Create Courses
✓
✗
✓
✗
Edit Courses
✓
✗
✓
✗
Assign Courses
✓
Own Team
✗
✗
View Analytics
All
Own Team
Courses
Assigned
Billing Access
✓
✗
✗
✗
Settings Access
✓
✗
✗
✗
Grade/Teach
✓
✗
✗
✓
Permission Labels
The system uses specific permission strings that control access. Permissions follow: resource:action:scope
Manage Usersusers:read:ownTeam list, invite modal
Create Coursecourses:create+New Course button
Billingbilling:readBilling menu entry
Analyticsanalytics:viewTracking menu, reports
Support Ticketssupport:ticket:viewSupport page
Integrationsintegrations:manageIntegrations page
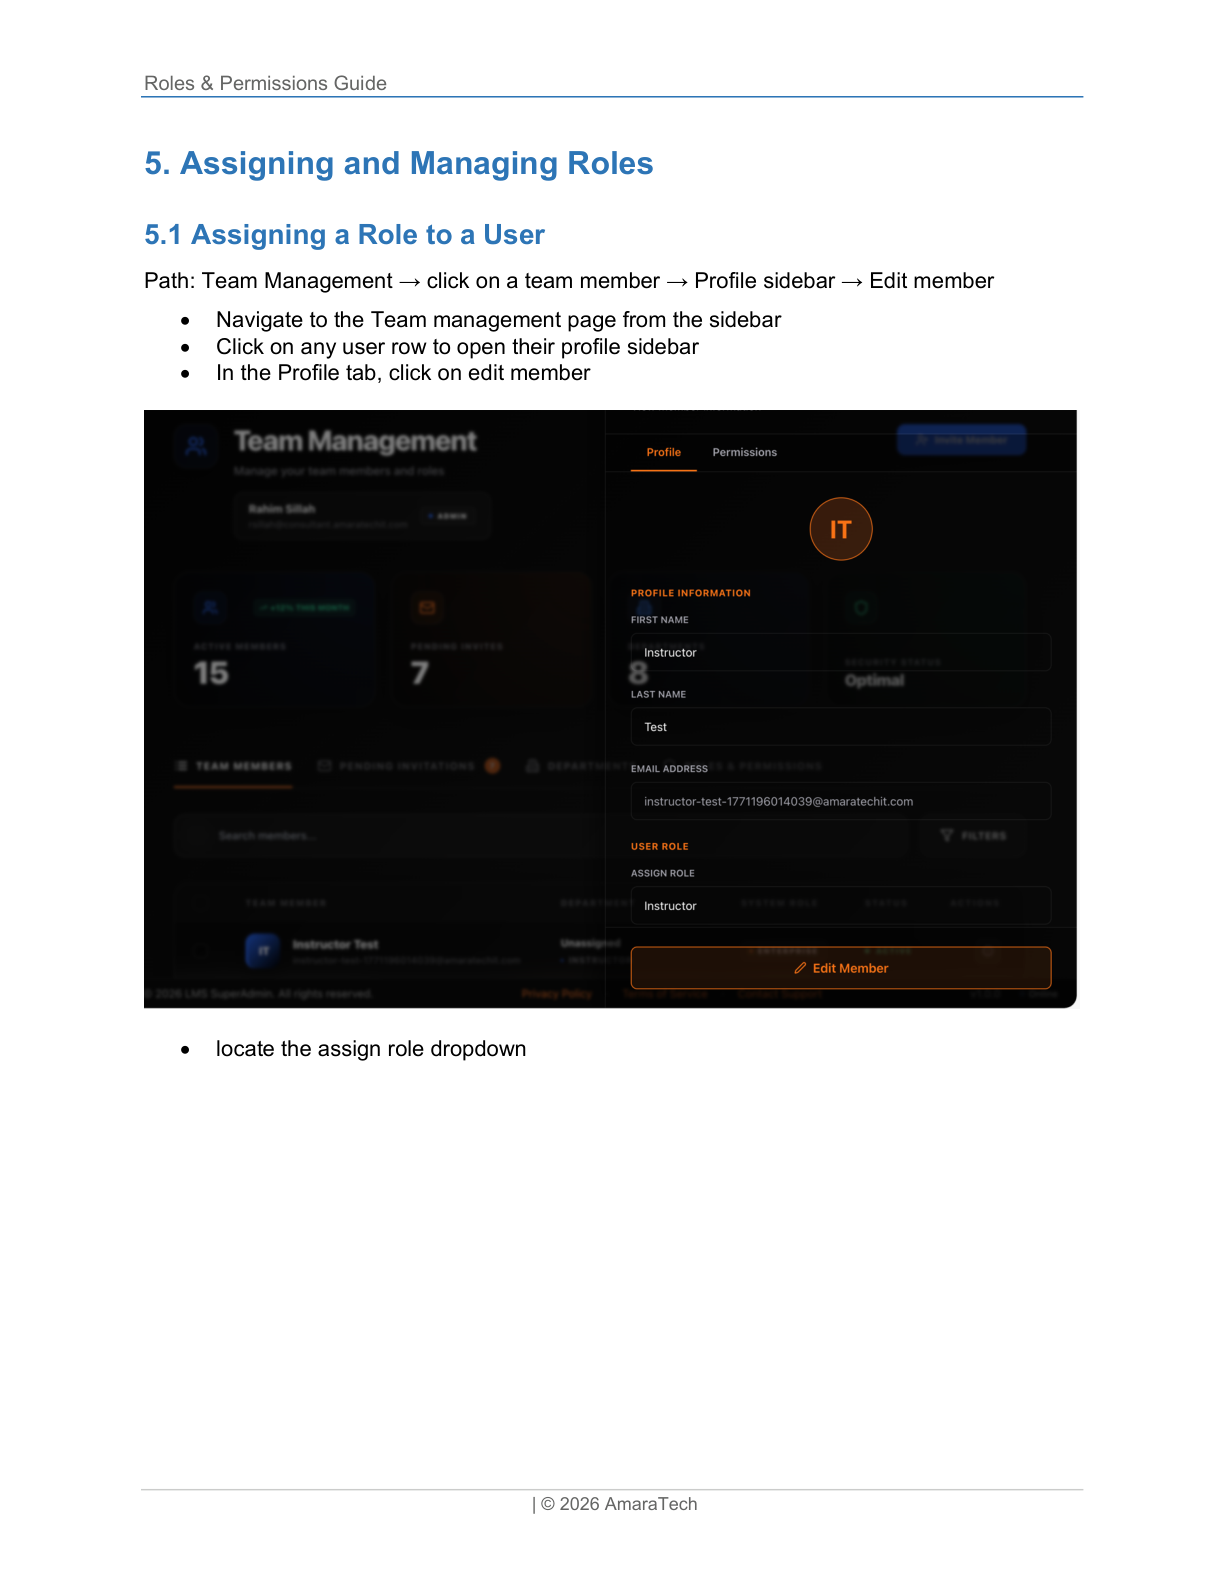
Assigning and Managing Roles
Assign Role to User
1
User profile sidebar
2
Role dropdown
3
Edit Member button
1User profile sidebar
2Role dropdown
3Edit Member button
Assigning a Role to a User
Path: Team Management → click on a team member → Profile sidebar → Edit member
1Navigate to Team Management
2Click any user row
3In Profile tab, click Edit member
4Locate the role dropdown
5Select desired role
6Click Save to confirm
7Permissions update instantly
Tip: Role changes take effect immediately. The user may need to refresh their browser to see updated menu options.
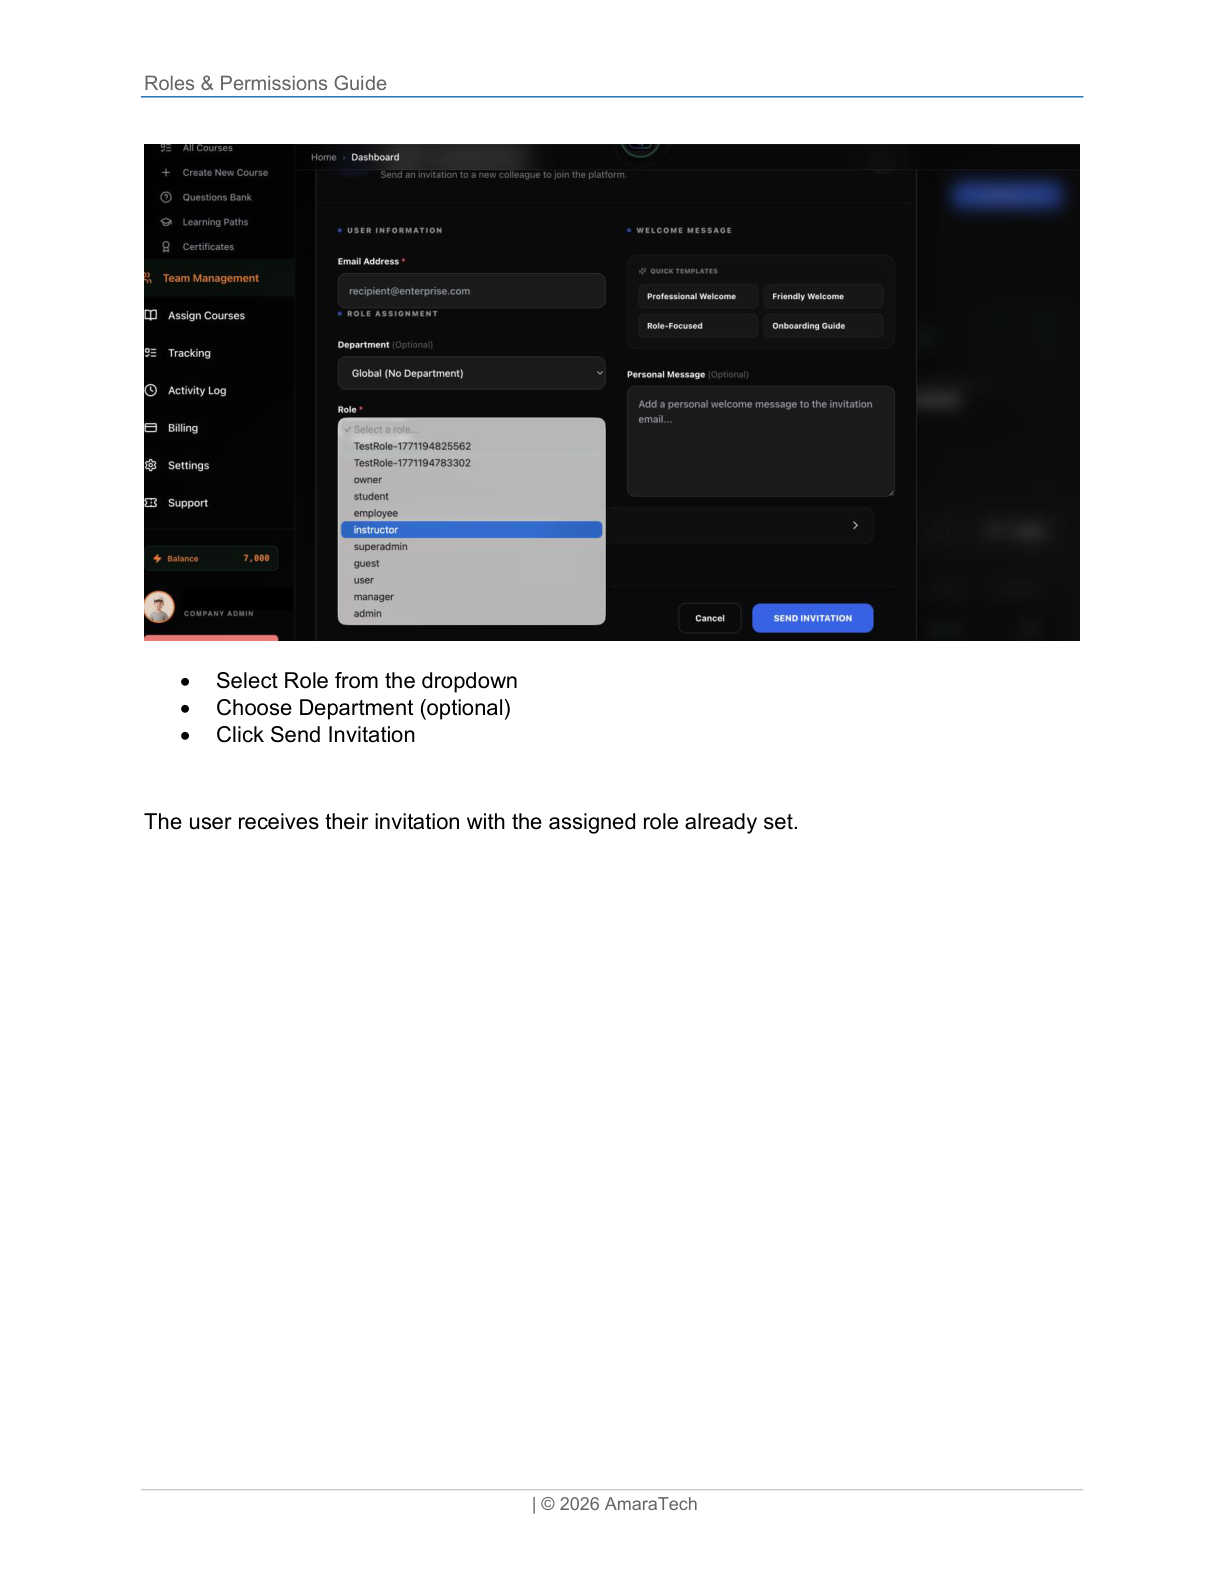
Assigning Roles During User Creation
When inviting new users:
1Click + Invite User button
2Fill in email and details
3Select Role from dropdown
4Choose Department (optional)
5Click Send Invitation
Invite User with Role
1
Email input
2
Role selector
3
Send Invitation button
1Email input
2Role selector
3Send Invitation button
The user receives their invitation with the assigned role already set.
Role Assignment Guidelines
HR ManagerCompany Admin
Training ManagerCompany Admin
Department HeadManager
Team LeadManager
Learning & DevCourse Admin
Subject ExpertInstructor
General LearnerLearner (default)
Security Considerations
Limit Company Admin to 2-3 trusted individuals
Use Manager or custom roles when possible
Separate content creation from user management
Use Course Admin for content creators
Reserve user management for HR/Training
Don't give everyone Admin "for convenience"
Principle of Least Privilege: Grant users only the permissions they need to do their job. Start with the most restrictive role and add permissions as needed. Regularly review and audit user roles. Review user roles quarterly and use audit log to track role changes.
Section 9
9 / 9
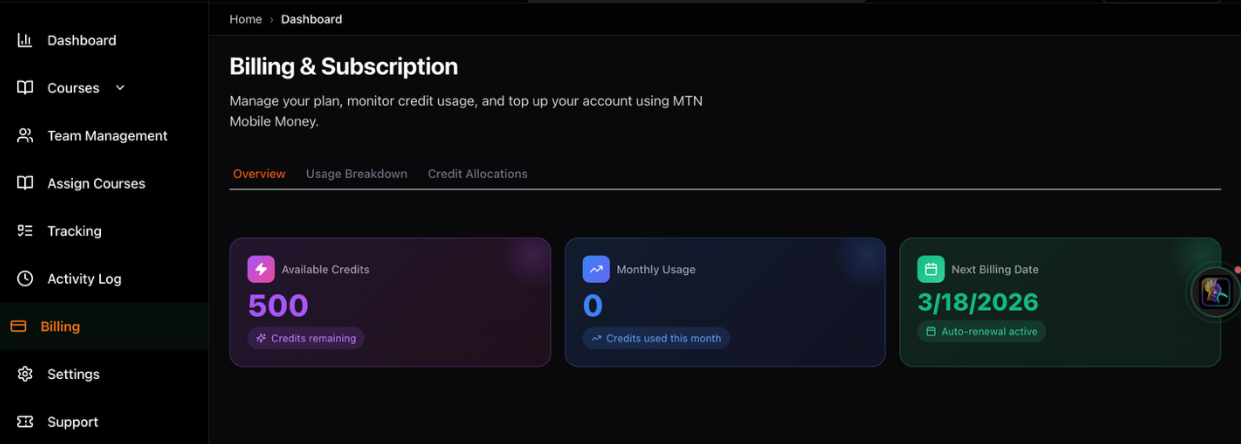
8. Billing & Subscription
Managing Plans, Payments & Credits
Accessing the Billing Section
Path
Sidebar → Billing
Permission
billing:read — Company Admins only
Accessing the Billing Section
1
Billing sidebar link
2
Billing page overview
1Billing sidebar link
2Billing page overview
The Billing page is organized into several tabs that help you manage your subscription, payment methods, usage, and transaction history.
Billing Page Overview
Available Tabs:
Subscription
View current plan and upgrade/downgrade
Payment Methods
Manage credit cards and mobile money
Usage
Track consumption of credits and features
Invoices
Download past invoices and receipts
Credits
Purchase and manage credit top-ups
Subscription Tab
Subscription Tab
1
Current plan details
2
Renewal date & status
1Current plan details
2Renewal date & status
Current Plan Information
Your current subscription displays:
Plan Name
Starter Pack, Creator Pack, Business Pack, or Enterprise
Billing Cycle
Monthly or Annual
Price
Current monthly/annual cost
Renewal Date
When your next payment is due
Status
Active, Trial, Past Due, or Canceled
Available Plans
Starter Pack
$29/mo
Creator Pack
Most Popular
Business Pack
$149/mo
Enterprise
Custom pricing
Usage Visibility & Alerts
What you now see
Department usage against your current plan
Certificate-enabled course usage against your current plan
Notifications when you are approaching or have reached a limit
Where it appears
Billing usage surfaces
Team Management department banner
Course wizard certificate banner
Notification bell and notifications page
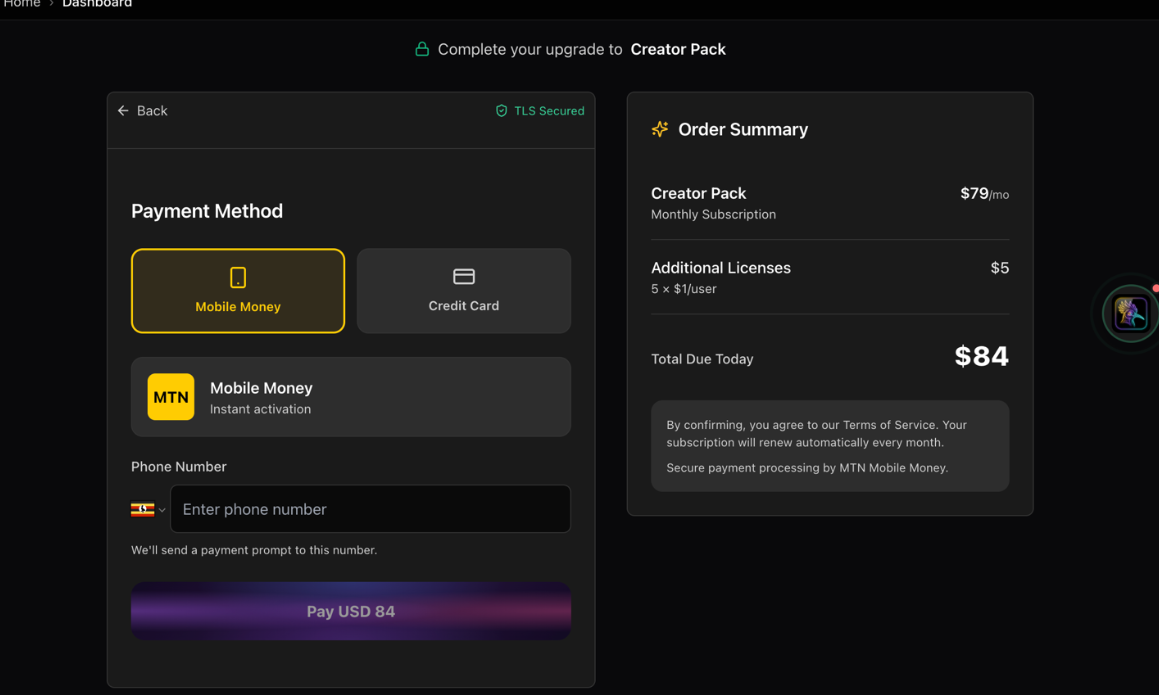
Upgrading Your Plan
Upgrading Your Plan
1
Plan selection
2
Checkout flow
1Plan selection
2Checkout flow
1Click "Choose plan"
2Review features & pricing
3Pick Monthly or Annual cycle
4Continue to Checkout
5Add payment method
6Review order summary
7Click Confirm Upgrade
8Plan activates instantly
Pro Tip: Upgrading mid-cycle gives you prorated credit for unused time on your previous plan.
Payment Methods Tab
Adding a Credit Card (Stripe)
Click + Add Payment Method
Select Credit Card
Enter card number, expiry, CVV, name, ZIP
Click Add Card
Card validated via Stripe
AmaraTech never stores your full card number.
Adding Mobile Money
Click + Add Payment Method
Select Mobile Money
Choose provider (M-PESA, MTN, Airtel, Orange)
Enter phone number
Verify account via SMS code
Click Add Account
Credits Tab
What Are Credits?
AI-powered course generation
Advanced analytics reports
Custom integrations
Premium support incidents
Overage charges
Current Credit Balance
Current Credit Balance
1
Available credits
2
Usage this month
1Available credits
2Usage this month
The credits dashboard shows:
Current balance
Available credits
Credits used
This month's usage
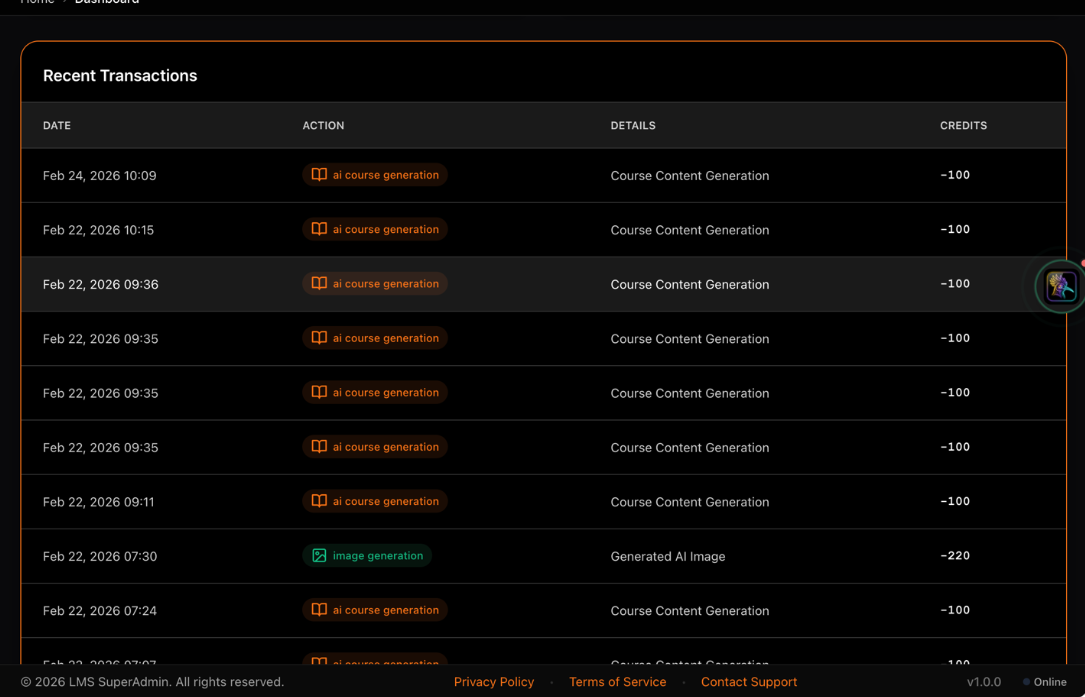
Recent transactions
Last 10 credit activities
Expiration dates
If applicable
Troubleshooting Billing Issues
Payment Declined
Common Causes
Insufficient funds
Card expired
Incorrect CVV or billing ZIP
Issuer fraud protection
Solutions
Verify card details
Contact bank to authorize
Try a different method
Use Retry Payment button
Cannot Change Plan
Possible Reasons
Payment method not added
Downgrade restricted by usage
Active trial period
Solutions
Add payment method first
Reduce usage below target limits
Contact support for assistance
Manage Your Subscription with Confidence: Monitor usage regularly, keep payment methods current, and review the product changelog for release-by-release updates that affect your plan, permissions, and support flows. Billing Questions? Contact billing@ignite.amaratechit.com